Thursday, December 03, 2015

Laundry Room Upgrade Reveal


I’ve been wanting to post this post for a while, but it seems that every time I wanted to take pictures, the weather didn’t want to cooperate with a sunny day. Sigh, such is life in the fall and winter.

Anyway, I’m VERY excited to show you my new, updated laundry room!

I think laundry rooms should be glamorous and fun; a place where you WANT to go. How many of you schlep down to a dark corner in your basement to do laundry? Not very inspiring is it? Well, I didn't exactly have to do laundry in a dark basement, but my laundry room certainly wasn't inspiring.

Take a look at what it used to look like: 


Blah, right? Uninspiring and kinda messy. 

So I began my transformation with some wallpaper ideas. You can see the samples I was trying out taped to the wall in the above picture. 

Next came this FABULOUS Italian mid-century chandelier that took us forever to figure out how to wire and install


This thing truly is gorgeous. I love it and want to marry it. 


But the transformation stopped there for several, several months until my 10-year-old washing machine started acting up. Really, it was on it's last legs. Besides not being able to select a few cycles on the control pad and only being able to use hot water on one cycle, it used to randomly beep out this morse-code conversation for minutes at a time. We used to joke that it was talking to the aliens. 

So, we had to go purchase a new washing machine, which made sense to include a new clothes dryer, since our old one was 10-years-old as well.

By this point, I had picked out the wall paper sample I wanted and had ordered it (hint, it was the second sample down from the top on the left), but was stalling on putting it up as I knew that meant moving the washer and dryer. Besides, I had never installed wall paper and I was nervous, so that made procrastinating easier. 

Once we had ordered a new washer and dryer, I knew it was now-or-never and dove in. After it was all said and done, this is what I ended up with:


I'm not sure if you can see it in the picture with Leo sitting in the window, but the wall paper is a sort of iridescent and white ginko leaf pattern. I wanted something that would pick up the brass/gold from the chandelier and not be too busy or dated. 

However, there were some major changes that had happened once the wall paper, washer, and dryer were installed. I'm not sure if you can see it, but our new dryer sticks out about 6 more inches than our old one did, so that forced me to change my ideas for the shelving.

I originally wanted a shelf that went across the front of the washer and dryer, and then turn at a 45° angle in the corner to the left. I was then going to install a smaller shelf above that

I also wanted and LUSTED over installing these brass shelf brackets from West Elm, but they were expensive and I would have needed like 9 of them to do what I originally wanted to do. 


But even after the change in plans, West Elm stopped carrying these. #storyofmylife

So then I thought, how about an Ikea hack like this?


But, I wasn't digging it, and by then we were talking about selling the house, so I went with some very simple bronze brackets I got from Home Depot. 

BUT, remember this old chandelier from before the kitchen remodel? This will replace the mid-century chandelier when we move...I am taking that baby with me! So, in hindsight, this old chandelier will match the black shelf brackets better.

NAILED IT!


I built and stained the shelf above the washer and dryer, as I wanted something with a skirt that would kind of hide the electrical outlets. I love my nail gun!

The shelf stain color is supposed to be "weathered grey" but it came out with more of a blueish tint, which actually tied into that piece of art I got from World Market.


Let's talk about that table!

The stainless steel table is from Home Decorators Collection, which is a subsidiary of Home Depot. It's a Martha Sterwart piece and is actually part of her garage organization collection, but it's the perfect height to stand in front of an fold laundry. 

It comes in three colors!

I also want to talk about those laundry hampers. They are from The Container Store and they are SUPER strong and durable! 


We have a third one up in our closet for dirty laundry. When I need to bring it downstairs, I literally grab it by the handle and drag it down the stairs without picking it up. I've been doing that for almost 2 years and the handle hasn't broken or shown any wear. Worth every penny.


Since we've updated our laundry room, I've been kind of a laundry nerd. Yes, I have bought into buying and using The Laundress products, even though they cost an arm and a leg. Don't hate, I love the smell! 

I've even taken to using these laundry balls in place of dryer sheets. They make the the clothes, and especially the sheets smell SOOOO divine. 

Mostly, I just love yelling, "HONEY, HAVE YOU SEEN MY BALLS?! WHERE ARE MY BALLS?"


Lastly, I want to talk about my Bravos XL 835 washer and dryer set. So far, I've been very happy with them, but they do make some odd noises that I haven't determined if they are "normal-odd" or "not-normal-odd". My thought is, BREAK NOW IF YOU'RE GOING TO BREAK since they are under warranty.

So, that concludes my glamorous laundry room journey. I love doing laundry now, and even tell my husband to not touch it!  I'm having so much fun!


Wednesday, December 02, 2015

Homemade Ground Horseradish

2 years ago, a coworker gave me a horseradish root to plant and I was smitten.

I planted it that year near my compost pile (which I may later regret) and proceeded to order more root stock from a seed company. When those roots came it, I planted those on the other side of the garden and now, this fall, I dug up this:


I LOVE horseradish and can never seem to find it hot enough in the grocery store, so when I learned I could actually grow it myself, well it was no surprise for me to give it a try.

From what I've read and heard, horseradish is invasive, so you have to be careful where you plant it. So far, I haven't seen that and relish every sprout that's come up. It's pretty easy to grow and so far, that has turned out to be true as well. Fall is when you should harvest it, but really, you can harvest it any time of the year...THAT'S how easy it is to grow.

Once you harvest it, clean off the roots/tubers and leave a few behind to grow for next year. Bring in the roots/tubers you want to grind up, break them into manageable chunks, and peel them like carrots.

After peeling, cut the chunks into 2-3 inch pieces, throw them into a food processor with a little water and process till grainy, but not too fine.


My husband tells me stories of his aunt Leona from Ohio sitting on the front porch shredding horseradish every year with a head full of snot and barely able to see through the tears. I thought, "Surely he is exaggerating," but no...imagine chopping onions, but multiply that times 10. Throw in about 5 lbs. of jalapenos to chop up with the onions and that equals ground horseradish.

I had to keep that bowl of ground horseradish and arm's length. Even my always-scrounging cats stayed out of the kitchen!

Add some vinegar and a couple of dashes of salt to the ground horseradish and stir. For the amount of ground horseradish I had, I added about 1-1 1/2 cups of vinegar; you want it to be kind of "sloppy" but not too runny. It won't hurt it.

Some people add a little sugar to their ground horseradish to help tame the heat a little and I did that as well; about 1/2 tablespoon. Once everything was stirred up, I spooned it into a quart jar, put a lid on it, and put it in the refrigerator.


I think we are ALL set for horseradish for a year (at least). I did not taste it because it was waaaaaay too hot; I couldn't even get close. I figured it's a lot like my Chili Paste where it tames down a bit from marinating in the vinegar after a while. 

Hmmm,...I see a prime rib roast on the horizon for Christmas or a ton of shrimp cocktail!

Tuesday, December 01, 2015

Canning Turkey Broth

When the weather turns cold, my canning habits often turn from boiling water bath to pressure canning. I know some people who freeze all their summer fruit and specifically wait to make jam or jellies in the winter when it's chilly outside and heating up a big, pot of boiling water sounds divine.


Thanksgiving gives me the perfect opportunity to make a batch of turkey broth, which can also be used in recipes that call for chicken broth. I often make soup with the turkey carcass, but sometimes you are ready to eat something different after 5 days of turkey leftovers!

So, turkey broth it is!

My chicken or turkey broth is often made different ways, depending on time and convenience. If I'm REALLY starting from scratch, I'll roast the vegetables and poultry pieces/parts first in the oven, then throw it all into a pot with some water and spices/herbs and simmer for a few hours. In the case of a leftover turkey carcass, I just throw it into a pot with some cut up veggies (carrots, onions, garlic, whatever...), add water, some peppercorns, a couple of bay leaves, and let it simmer away.

So, there really isn't a recipe per se, but turkey or chicken broth DEFINITELY has to be pressure canned for safety.

The biggest tip I can give you regarding making turkey or chicken broth is to let your broth cool over night in the refrigerator so you can skim off any congealed/hardened fat floating on top of the broth before reheating and canning.

I didn't do this with this batch and 3 of the 6 quarts that were produced did not seal. This is due to the fat/grease getting under the lid and preventing a solid seal from happening.


So, that means I have 3 quarts of turkey broth in my refrigerator waiting to be made into something. Looks like soup will be on our menu some day this week!.

Monday, November 30, 2015

Gratuitous Kitteh Monday


Well, I hope you had a wonderful and happy Thanksgiving! We had a very quiet turkey day with just the two of us, but I did crank out a yummy bird with all the fixings. Sometimes it's good to just do your own thing.

I can tell by my posting stats that you all have been looking for faster, easier ways to make mashed potatoes for the big day, as my #1 post viewed this past month was:

How To Use a Pressure Cooker: Mashed Potatoes in 10 Minutes!

So easy!

You all are also busy finding ways to pack and ship your yummy canned goods for Christmas, as my #2 most viewed post was:

How To Pack and Label Canned Food for Shipping

I'm going to be doing that again very soon. I need to make some more jams though. I've been busy making cookie dough to freeze for The Great Cookie Bake of 2015 and I'm almost set. It's such a tedious thing to coordinate everything and ship it all out, but it's worth it.

Things should be back to "normal" for the next couple of weeks as far as posts go. I have some new things that I've done and projects completed that I'm dying to share!

Now, where's the leftovers?

Tuesday, November 24, 2015

Gratuitous Kitteh Monday

I know it's not Monday, but things have been SUPER crazy around here.

But first, shhhhh....don't tell them they are sleeping in a DOG bed!


It may not seem like much, but this pic is a BIG deal. Miss Thang still has her opinions about Leo The Kitten, and the fact that she is letting him clean her in that big, warm bed by the fire is a big step in the right direction. She is less growly around him, but definitely does not like it when he pounces on or harasses her. She is definitely a Diva in her own mind!

But, a little feedback from last post: No, I did not get the job, but I DID pass my professional certification exam and I am sooooo relieved. We talked to our realtor a week or so ago and we are all set to put our house on the market next spring.

But until then, there will be warm fires and kitteh cuddle sessions.

Wednesday, November 04, 2015

Fall Happenings


Things have been pretty hectic around here lately and it looks like hubby and I are in for some even bigger changes ahead in the next coming months and following year.

We have decided to sell our beautiful country house next spring.

I know....AGAIN! This will be the 4th time we've moved in less than 6 years.

This has actually been something that's been at the back of our minds for a while now and we weren't even planning on acting on this until at least 2017, but we are motivated to act earlier. Turns out our neighbors, who have the exact same house as ours, are selling next year too. They have had their house appraised at a lower price than ours, so after talking to them, it seems like the smarter move for both parties would be for us to sell first at a (hopefully) higher sale. That way, we both benefit from the higher sale and comps. So, it looks like our plans got bumped up.


I've always said that you get a house just the way you like it and then it's time to sell, but the truth is, I'm looking forward to moving back into the "burbs". Living here has been a lesson on what kind of people we really are and our lifestyle. Although I have many "country ways," I am not a country girl...at least not one who has to travel into DC for work. :-)


Speaking of work, I have a big interview tomorrow for a new job that I am excited about (at least for now...you never know). If I get this job, my commute will go from 0 to 1000 in a flash and moving will be pretty much mandatory, as I don't want to spend 4-5 hours a day sitting in DC traffic.

I have a big professional certification exam that I am taking on the 23rd of this month that I've been studying with a study group for 3 months. I'm pretty nervous about that too, so not too much cooking or DIY stuff has been going on....well SOME. I will post when I am done and have time.

So, the next couple of months will be committed to doing all those little projects that I've been putting off, but now HAVE to be done in order to sell. SIGH...the story of my life.

Thursday, October 29, 2015

Tips for Painting Your Kitchen Cabinets (Part 3)


Welcome to the third and last part of my short series on helpful tips for painting your kitchen cabinets. Yesterday, I posted two videos that went over the importance of lighting and in what order to paint your cabinet surfaces for the best result, and today I have two more videos that cover how to and the importance of sanding and cleaning your doors/drawers/frames before moving on.

This first video goes over the type of sanding tools I use and how to sand your kitchen cabinet doors in between coats of primer and paint.


This second video goes over the importance of why and how to clean your kitchen cabinet doors after you sand.


That's it folks for my little series on helpful tips for painting your kitchen cabinet doors! I hope the videos shed a little extra light onto some of the minutia of prepping your surfaces before those two, final coats of paint. Believe me, that extra work makes a difference!

I've had a my house painter, Bill, who paints houses and cabinetry for a living compliment me on my work and even ask ME for tips, so I take that as one of the highest compliments. The extra work also ensures the quality of adhesion, which in the 6 months that we've been using our "new" cabinets, we've not had one chip or flake come off, so that says something.


Wednesday, October 28, 2015

Tips for Painting Your Kitchen Cabinets (Part 2)


So now you have some helpful tips to get your started, I wanted to show you some helpful videos I took on how to prime, sand, and clean your kitchen cabinet doors, drawers, and framing.

In order to have that pristine, almost sprayed-on-paint end result, it is SUPER important to prep your surfaces correctly. This includes sanding, cleaning, and priming. I rolled out the primer and paint on my cabinets using cabinet painting rollers and a 1 1/2 inch paint brush. This is pretty much what my normal set-up looked like (minus the primer):


This first video outlines the importance of good lighting, especially when painting white-on-white like I did. I apologize if the videos are kind of rough and unedited:


This second video goes over the importance of HOW to prime or paint your surfaces for the best finish. There is a method to the madness, and again I apologize for the unedited videos and if I'm not entirely consistent on what I label things (flat surfaces versus edges/sides):


Stay tuned for the next video installment tomorrow, where I talk about the importance of and how to sand and clean your doors after priming and painting.

Tuesday, October 27, 2015

Tips for Painting Your Kitchen Cabinets (Part I)


Hi everyone! this post has been at the back of my mind for a while. This is the first part of a series, which will include "How-To" tips and videos, and will hopefully provide some extra insight for painting your kitchen cabinets.

For anyone just joining, I upgraded and painted my kitchen cabinets earlier this year and learned a few important tips along the way that might help some others who are just venturing down that LOOONG road.

I'm going to be honest; it took me a LONG time to paint my kitchen cabinet doors (149 hours!!!) and this had to do with several things:

First, I had a total of 19 cabinet doors and 7 drawer fronts, plus the cabinet framing. That's a lot of d*mn wood to paint!

Second, I followed the following very tedious process for each door, drawer, and cabinet frame:
  •          Degloss, SAND and CLEAN
  •          Prime, SAND and CLEAN
  •          Prime, SAND and CLEAN
  •          Paint, SAND and CLEAN
  •          Paint
Each door, drawer front, and all the cabinet frames got 2 coats of primer and 2 coats of paint with sanding and cleaning in between. I used Zinsser Bull's Eye 1-2-3 primer and INSL-X Cabinet Coat Acrylic for the cabinet doors. The primer I got from Home Depot or Lowe's and the cabinet coat I got from Benjamin Moore; however, I think the big box stores sell it as well. 

Third, I worked full time during the day and had to squeeze in doing this between my job and other, regular life issues. 

So, that being said, it took me a very long time, BUT it was worth every minute and even after a while, it was kind of therapeutic.

I also used the VERY helpful painting tips from Erin at Red House Renovation. My inspiration!

SO...without further adieu, let's get painting!

Helpful Tips for Painting Your Kitchen Cabinet Doors

Scrape Off Bumpers

Cabinet bumpers are those little rubber or velvet adhesive dots that are stuck to the inside of a cabinet door. They prevent your doors from slamming loudly against the cabinet frame when being closed. When you peel these off, you will most likely have a sticky, adhesive residue left behind. If your cabinets are a few years old, that residue will have most likely hardened into a dry, papery lacquer. You won’t be able to feel it, but it’s there and will most definitely interfere with your paint results. It will ultimately soften under the primer and paint and eventually separate from the wood, causing a bubble or chip in your beautiful finish. 

So, scrape off that bumper adhesive!

Scraping off cabinet bumpers and glue

Wear Gloves!

Rubber gloves are going to be your friend throughout this whole process.

Wear rubber gloves when degreasing:
A strong degreaser will dry your hands out like nobody’s business. So, protect your skin and wear gloves when using a degreaser.

Wear rubber gloves when sanding primer coats:
When sanding primer, the sanding dust will get into the grooves/lines in your hands and really, REALLY dry them out.  Even washing them and using lotion doesn’t help. It’s almost as if the primer dust creates a waterproof barrier that makes your hands feel like they are coated in chalk. Do you and your hands a favor by wearing gloves when you are sanding.

Wear rubber gloves when reinstalling your hinges:
Those hinges are most likely coated in graphite, which is a dry lubricant powder that makes them work easily; however, that graphite powder is the equivalent of burnt charcoal dust smeared on your newly painted cabinet doors. It gets everywhere and took my husband 2.3 seconds to get black, smudgey fingerprints all over my barely dried, pristine white cabinet doors. Also, there is a chance that your door hinges might be greased or have grease/food stains on or in them, and these will mess up your door finish too. Wear gloves to keep your doors clean.

Wear gloves when installing hinges

Flotrol Is Your Friend

Flotrol is your next best friend. Flotrol is an additive that is used to help thin out latex paint so it will level smooth like an oil paint, as well as give you additional drying time. Sometimes, you will need to go back over a spot with your brush and roller. If it has already started to dry pretty well, going back over it will ruin your finish. Flotrol gives you extra time to smooth out blemishes before your paint starts to dry; therefore, preventing drag marks left by your paintbrush.

NOTE: It's VERY important to shake the bottle of Flotrol well before mixing with your paint!


Drying Time is Not Curing Time

When painting, please be aware that just because the paint is dry, it does not mean that it has cured. What is the difference between drying and curing?

Drying time, which is usually 8-12 hours after you apply paint, is the time it takes for the paint to dry to “finger touch”. Although the paint is dry, it will still feel a little tacky and rubbery.

Curing time, which can be anywhere from 7-30 days after the paint has dried, is the amount of time it takes for paint to harden and resist chips and peeling.

Your beautiful paint job is at its most vulnerable between the drying and curing time. Until the paint fully cures, be very, VERY careful not to bump, scrape, or ding your cabinets. Be hyperaware of how you move about your cabinets during this time.

Extra Lighting is Necessary

I invested in a very important task light went painting my cabinets. This light helped me spot drips or build-up of paint that I couldn't see using direct lighting, or sanding dust that I missed after cleaning. The light casts shadows, which make drips and debris show up easier. This is VERY important if you are painting white-on-white like I did.  

I think you can buy one of these from Home Depot or Lowe's for around $35.

A task light will help you immensely!

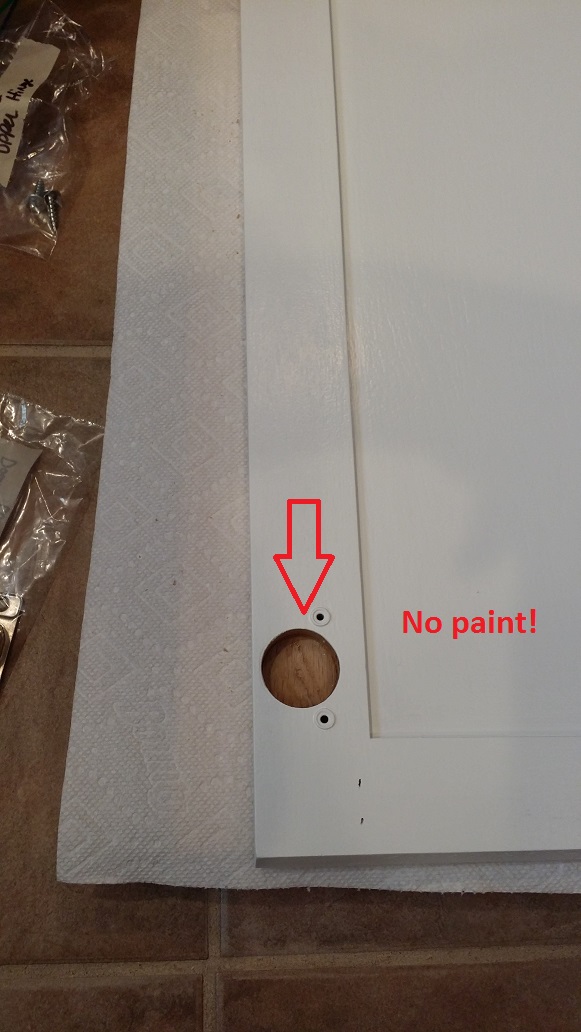
Don't Paint Inside Door Hinge Routing

Okay, this might be a given, but I learned the hard way to NOT paint inside the routed-out holes for my door hinges. On the first set of doors I painted, I did that and the hinges were a complete PITA to get back in. 

From then on, I left the inside of the routed hinge holes non-primed and non-painted! So much easier!

Don't paint inside the routed hinge holes!
That's all I have for now outside of all the usual tips. Stay tuned for my next post, which will include some "How-To" videos!

Monday, October 26, 2015

Gratuitous Kitteh Monday

We're up to Halloween hi-jinx here at JTRS this week.

First off, is there anything cuter than a kitten in a Halloween tee-shirt?


No? How about a kitteh in a sailor costume?


Or even better! How about Bob MEOW-LY? Get it? 

She's a "Rasta-FURian"!


Hooo, I'm LOVING this! The kittehs...not so much. 

Thursday, October 22, 2015

Crockpot Banana Nut Bread Cake

Hey ho; welcome back!

I’ve spent a little time tweaking things around here and the new template, but still have a few things to add and adjust. That will come. I also took advantage of this time to take a little break, but that doesn’t mean I haven’t been busy!

For example, check out this amazing Crockpot Banana Nut Bread Cake I made:


This bread/cake is AMAZINGLY moist and stays moist for days afterwards. It is so good, that I think I may have found a replacement recipe for my Cream Cheese Banana Nut Bread. I originally got this idea from Mom on Time Out's Slow Cooker Pumpkin Pie Cake recipe, which is amazing as well.

The only downside that I have found so far is the baking time, but really, you can just set-it-and-forget-it if you want to go off and do other things for a few hours. How awesome is that? And when you come back, the house smells like someone is baking something special just for you.

Can you imagine whipping up this batter beforehand and cooking it in a Crockpot at work for your next potluck luncheon? I can.


Kathy's Banana Nut Bread Cake
Recipe modified from: Mom on Time Out

1/2 cup butter
2 cups brown sugar
3 eggs
2-3 over ripe bananas, mashed (about 1 1/2 cups)
1 tsp vanilla extract
1 1/2 cups all purpose flour
1 1/2 tsp baking powder
1 1/2 tsp baking soda
1/2 tsp ground cinnamon
1/8 tsp ground cloves
1/8 tsp ground allspice
1/8 tsp ground ginger
1/2 tsp salt
1 cup toasted pecans, chopped

Line slow cooker/crockpot with a tin foil sling. Follow Mom on Time Out's example for how to make a tin foil sling. Spray tin foil with Pam. Cream butter with sugar until pale and fluffy; add eggs one at a time, mixing well in between. Add the mashed banana and vanilla extract and mix till incorporated. Combine the dry ingredients together first (or sift) in a bowl, then add to the banana mixture. Mix until incorporated, but don't over mix. Hand stir in nuts.

Pour batter into slowcooker/crockpot and cook 2-3 hours on high. Rotate tin foil sling halfway through baking to avoid over baking or burning on hot spots in your Crockpot. Start checking cake around 2 hours and test with a toothpick or butter knife. Cake is done when a toothpick or butter knife is inserted and comes out clean.


When finished, remove cake using the sling and place on a cooling rack. Peel tin foil away to allow to cool.


Then try not to eat it all!


Friday, October 02, 2015

Under Construction

As you can see, there are some changes going on here at JTRS! A new template, a better way to search for recipes and information, and there will be Facebook, Pinterest, Twitter and Instagram accounts!

Things are still changing and moving around so I appreciate your patience while this is going on. Hopefully, things will smooth out and I will have a solid redesign over the next couple of weeks.


design + development by kelly christine studio