

Hi everyone! this post has been at the back of my mind for a while. This is the first part of a series, which will include "How-To" tips and videos, and will hopefully provide some extra insight for painting your kitchen cabinets.
For anyone just joining, I upgraded and painted my kitchen cabinets earlier this year and learned a few important tips along the way that might help some others who are just venturing down that LOOONG road.
I'm going to be honest; it took me a LONG time to paint my kitchen cabinet doors (149 hours!!!) and this had to do with several things:
First, I had a total of 19 cabinet doors and 7 drawer fronts, plus the cabinet framing. That's a lot of d*mn wood to paint!
Second, I followed the following very tedious process for each door, drawer, and cabinet frame:
Third, I worked full time during the day and had to squeeze in doing this between my job and other, regular life issues.
- Degloss, SAND and CLEAN
- Prime, SAND and CLEAN
- Prime, SAND and CLEAN
- Paint, SAND and CLEAN
- Paint
Each door, drawer front, and all the cabinet frames got 2 coats of primer and 2 coats of paint with sanding and cleaning in between. I used Zinsser Bull's Eye 1-2-3 primer and INSL-X Cabinet Coat Acrylic for the cabinet doors. The primer I got from Home Depot or Lowe's and the cabinet coat I got from Benjamin Moore; however, I think the big box stores sell it as well.
So, that being said, it took me a very long time, BUT it was worth every minute and even after a while, it was kind of therapeutic.
I also used the VERY helpful painting tips from Erin at Red House Renovation. My inspiration!
SO...without further adieu, let's get painting!
Helpful Tips for Painting Your Kitchen Cabinet Doors
Scrape Off Bumpers
Cabinet bumpers are those little rubber or velvet adhesive
dots that are stuck to the inside of a cabinet door. They prevent your doors
from slamming loudly against the cabinet frame when being closed. When you peel
these off, you will most likely have a sticky, adhesive residue left behind. If
your cabinets are a few years old, that residue will have most likely hardened
into a dry, papery lacquer. You won’t be able to feel it, but it’s there and
will most definitely interfere with your paint results. It will ultimately soften
under the primer and paint and eventually separate from the wood, causing a bubble
or chip in your beautiful finish.
So, scrape off that bumper adhesive!
 |
| Scraping off cabinet bumpers and glue |
Wear Gloves!
Rubber gloves are going to be your friend throughout this
whole process.
Wear rubber gloves when degreasing:
A strong degreaser will dry your hands out like nobody’s business.
So, protect your skin and wear gloves when using a degreaser.
Wear rubber gloves when sanding primer coats:
When sanding primer, the sanding dust will get into the
grooves/lines in your hands and really, REALLY dry them out. Even washing them and using lotion doesn’t
help. It’s almost as if the primer dust creates a waterproof barrier that makes
your hands feel like they are coated in chalk. Do you and your hands a favor by
wearing gloves when you are sanding.
Wear rubber gloves when reinstalling your hinges:
Those hinges are most likely coated in graphite, which is a
dry lubricant powder that makes them work easily; however, that graphite powder
is the equivalent of burnt charcoal dust smeared on your newly painted cabinet
doors. It gets everywhere and took my husband 2.3 seconds to get black, smudgey
fingerprints all over my barely dried, pristine white cabinet doors. Also,
there is a chance that your door hinges might be greased or have grease/food
stains on or in them, and these will mess up your door finish too. Wear gloves
to keep your doors clean.
 |
| Wear gloves when installing hinges |
Flotrol Is Your Friend
Flotrol is your next best friend. Flotrol is an additive that
is used to help thin out latex paint so it will level smooth like an oil paint,
as well as give you additional drying time. Sometimes, you will need to go back
over a spot with your brush and roller. If it has already started to dry pretty
well, going back over it will ruin your finish. Flotrol gives you extra time to
smooth out blemishes before your paint starts to dry; therefore, preventing drag marks left by your paintbrush.
NOTE: It's VERY important to shake the bottle of Flotrol well before mixing with your paint!

Drying Time is Not Curing Time
When painting, please be aware that just because the paint
is dry, it does not mean that it has cured. What is the difference between
drying and curing?
Drying time, which is usually 8-12 hours after you apply
paint, is the time it takes for the paint to dry to “finger touch”. Although
the paint is dry, it will still feel a little tacky and rubbery.
Curing time, which can be anywhere from 7-30 days after the
paint has dried, is the amount of time it takes for paint to harden and resist
chips and peeling.
Your beautiful paint job is at its most vulnerable between
the drying and curing time. Until the paint fully cures, be very, VERY careful
not to bump, scrape, or ding your cabinets. Be hyperaware of how you move about
your cabinets during this time.
Extra Lighting is Necessary
I invested in a very important task light went painting my cabinets. This light helped me spot drips or build-up of paint that I couldn't see using direct lighting, or sanding dust that I missed after cleaning. The light casts shadows, which make drips and debris show up easier. This is VERY important if you are painting white-on-white like I did.
I think you can buy one of these from Home Depot or Lowe's for around $35.
 |
| A task light will help you immensely! |
Don't Paint Inside Door Hinge Routing
Okay, this might be a given, but I learned the hard way to NOT paint inside the routed-out holes for my door hinges. On the first set of doors I painted, I did that and the hinges were a complete PITA to get back in.
From then on, I left the inside of the routed hinge holes non-primed and non-painted! So much easier!
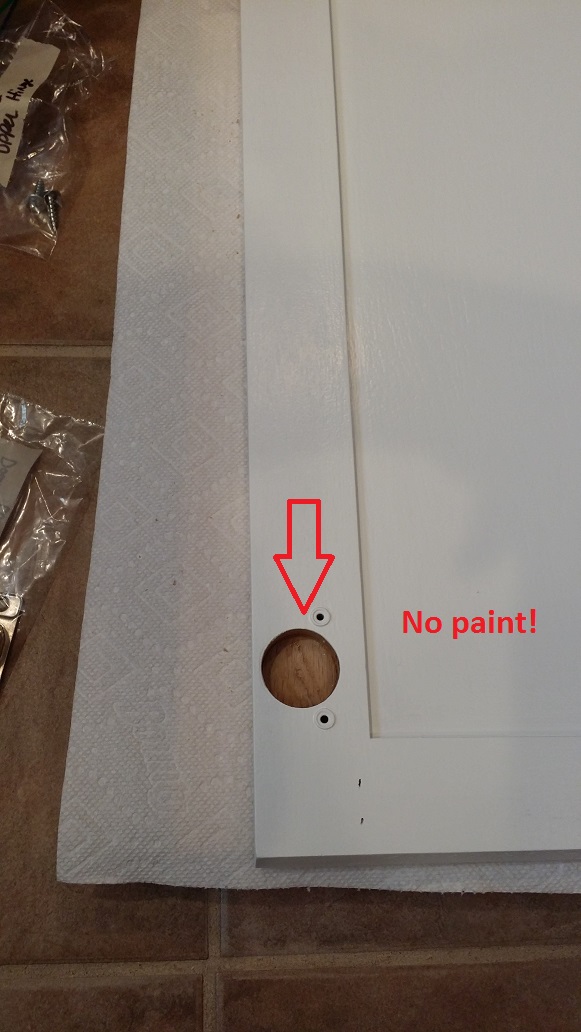 |
| Don't paint inside the routed hinge holes! |
That's all I have for now outside of all the usual tips. Stay tuned for my next post, which will include some "How-To" videos!


No comments:
Post a Comment