Thursday, June 24, 2010

Bruised Ego Jam

Can Jam Challenge #6

This month's Can Jam Challenge brings you a fairy tale full of promise and disappointment. Enjoy.


nce upon at time, there was a bee-yoooo-tiful princess who decided one day to collect fresh berries from the forest (okay, a swampy area next to an office building in a business park). The princess knew there was a very rare and secret patch of blackberry bushes that had given her delicious berries in the past, but the harvest was always too small. But a very cold winter and a warm spring had made this year’s blackberry bushes heavy with fruit, and the princess was off to gather the bounty.

After she had collected the luscious, wild blackberries, the beautiful princess wondered what she would do with them. Surely since these were no ordinary berries, they deserved something special and magical. “I know,” she thought “I will ask the fairy Godmother Christine Ferber for guidance!” So, the princess summoned the fairy Godmother and was lead to a recipe of fresh blackberry and blueberry jam. “Oh, how delicious!” exclaimed the princess, “I will make it at once.”


The princess followed the fairy Godmother’s recipe directions exactly. “This is going to be the most scrumptious jam the kingdom has ever tasted,” thought the princess. She envisioned dark, jeweled jars filled with the delicious jam, and how the very taste of it would make the prince fall in love with her over, and over again (okay, my awesome husband).

Suddenly, at the very last moment, two evil sock serpents appeared and whispered in the princess’ ear, “Cook the jam to 240° versus 220°….trussssst ussssss.” The princess was confused and in haste, she cooked the jam at the higher temperature. Immediately, the princess knew there was something wrong. The beautiful jam had become sticky and tough. The once beautiful blackberries were sort of crunchy!


The princess wept and cursed a streak of obscenities that would make a sailor blush. “All that work! All that time! Those beautiful berries are ruined!” she cried. The jam was so terrible, that the princess didn’t even bother processing it in the jars. She left the jars on the kitchen counter as a sad reminder of how important it is to double-check jam processing instructions, even if you have done it a million times.

The End.

Tuesday, June 22, 2010

Loafing Around

I made this bread the night before last and it was all I could do to keep myself from tearing into it right out of the oven.

I lasted 20 minutes.

Ina Garten's Honey White Bread
I know you're "supposed" to wait until a fresh-baked loaf of bread cools before slicing (as escaping steam will cause the loaf to dry out), but sometimes YOU CAN'T HELP YOURSELF.

I loves me some Ina!

Honey White Bread
Recipe source: Barefoot Contessa At Home

1/2 cup warm water
2 packages dry yeast
1 teaspoon sugar
1 1/2 cups warm whole milk (110 degrees)
6 tablespoons butter (3/4 stick)
1 1/2 tablespoons honey
2 extra large or large egss, separated
5 to 6 cups AP flour
1 tablespoon salt

Place water in the bowl of an electric mixer fitted with a dough hook attachment. If the bowl is cold, be sure the water temp does not drop below 110 degrees. Add the yeast and sugar; stir and allow them to dissolve for 5 minutes.

Add the milk, butter, and honey. Mix on med-speed until blended. Add the egg yolks, 3 cups of the flour, and the salt. Mix on low speed for about 5 minutes. With the mixer still on low speed, add 2 more cups of flour. Raise the speed to med and slowly add just enough of the remaining flour so the dough doesn't stick to the bowl. Knead on med speed for about 8 minutes, adding flour as necessary.

Dump the dough out onto a floured surface and knead by hand for a minute, until the dough is smooth and elastic (I didn't need to do this...I just let the mixer do the work). Grease a bowl with butter, put the dough in the bowl, then turn it over so the top is slightly buttered. Cover the bowl with a damp towel and allow to rise for 1 hour, until doubled in volume.

Grease two 9 X 5-inch loaf pans with butter. Divide the dough into half, roll each half into a loaf shape and place each in a prepared pan. Cover again with the damp towel, and allow to rise again for an hour, until doubled in volume.

Preheat the oven at 350°. When the dough is ready, brush the tops with the egg white and bake the breads for 40-45 min, until they sound hollow when tapped. Turn them out of the pans and cool completely on a wire rack before slicing.

Honey white bread

Friday, June 18, 2010

Kool-Aid Pickles: Oh, Yeah!

Can you handle one more pickle post? I think so!

So, I was wandering around the internets last week looking for information on calcium chloride, when I came across a recipe for Kool-Aid Pickles.

Koolaid pickles
Abomination? Food science geekery? Pure genius?

Apparently, they are a deep, deep, I mean DEEP Southern delicacy. I'm talking Mississippi Delta here people! They're a bit like the concept for fried green tomatoes or boiled peanuts: you either love them or are disgusted immediately.

From what I've read, kids looooove them, and I must admit they are addicting. They're messy (think red Kool-Aid on white carpet) and taste a lot like cherry flavored bread-and-butter pickles. Wouldn't these be great to serve at a Halloween party?

Behold: One of the rare times I will actually purchase a jar of pickles from the store (just in case this was a flop...can't waste good, homemade pickles!)...


Kool-Aid Pickles

1, 46-oz. jar of Kosher pickles (whole)
*2 small packs of Kool-Aid powder
2 cups warm water
1 cup sugar

Open the pickle jar and dump the brine. Remove pickles and slice each pickle in half lengthwise. Pack pickles back in jar. Mix warm water, Kool-Aid, and sugar together; stir until the sugar is dissolved. Pour Kool-Aid mixture over pickles. Cap the pickle jar and place in the refrigerator for 24 hours. For more flavor, leave pickles in brine for several days.

*Note: I used Cherry flavored Kool-Aid, as that seemed to be the most highly rated flavor, but feel free to experiment with other flavors. I've heard lemon-lime is also good, but grape is yuck!

Tuesday, June 15, 2010

The Perfect Pickle

Friends, lovers, Maytag Repairmen, I present to you The Perfect Pickle!

Cue the singing angels now…

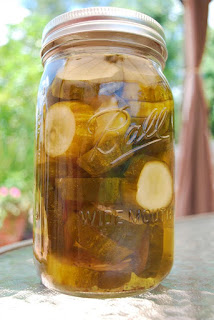
Perfect bread and butter picklesIt has taken me 4 years to get to this point. Great pickles, even simply good pickles require a delicate balance of three elements: brine, salt, and crunch. Technically, you could say it’s just two elements because salt is an element of the brine, but I digress.

If any one of those elements are not just right, then it’s all for naught. The frustrating part is you never know if you have a good pickle or a lousy pickle until they age a little bit. By that time, pickling cuke season is over and you have to wait till next year to try again. In the meantime, you’re stuck with a gazillion jars of meh.
These pickles are ready to eat in about a week. Trust me...you won't be able to stop once you start!

Kathy’s Perfect Bread and Butter Pickles
Recipe modified from: The Joy of Pickling
Makes 6 quarts

5-6 pounds pickling cukes
8 cups cider vinegar
6 cups sugar
1 tsp celery seeds
*1/3 to ½ cup pickling salt
10-12 cinnamon sticks, broken in half
¼ cup whole allspice berries
1 tablespoon whole cloves
7-9 teaspoons calcium chloride (aka Pickle Crisp), optional

*Note: Start with 1/3 cup and add salt to taste. I ended up using ½ cup.

Wash cukes and remove the blossom ends. Cut cukes into large slices/chunks. Set aside.

In a large pot, combine vinegar, sugar, celery seeds, and salt to taste. Combine spices and tie up in a cheesecloth sachet or large, metal teaball. Add spice sachet to brine and bring brine to a boil. Lower temperature and simmer for 30 minutes. After 30 minutes, remove spice sachet and set aside. Add sliced cucumbers to the brine and slowly bring back to a boil.

Once reaching a boil, remove brine with cucumbers from stove and add calcium chloride; stir well. Using a slotted spoon, pack cucumber into prepared jars, adding 1 allspice berry and 2 cloves to each jar from the spice sachet. Ladle hot brine in jars, leaving ½ inch headspace.

Process jars in a BWB for 10 minutes.

Thursday, June 10, 2010

Tomato Harvest

While the rest of the country is just getting warmed up for summer produce, Florida has already finished its tomato, cucumber, and corn season for the spring. June brings us fresh blueberries, and the rest of the summer is pretty much survival of the fittest. The good news is we get to do this all over again in about 4 months.

I often compare our summers to winter up north. Locals get smart and huddle inside away from the heat of the day and scorching sun. We know better. We save our “inside projects” for the summer when the weather outside is unbearable. During cooler months, it’s hard to keep a Floridian inside for 10 minutes.

See, just like Northerners. We’re just flip-flopped!

My tomato harvest this spring was very successful. I only grow about 8-10 plants and that’s plenty for the two of us. I’ve played around for the past couple of seasons by not keeping track of what I was growing, but last fall and this spring I kept notes. This season I planted Better Boy and was very happy. I grow only in containers as I have found the plants do much better this way. I have more control over their water content, fertilizer, and pest control. I also found I’ve had no incidents (knock-on-wood) with four-legged critters when growing maters in pots.

Anyway, the best thing to do with a tomato is eat it fresh! My preference is sliced with fresh basil, mozzarella, good olive oil, and a sprinkle of sea salt and pepper. But I also adore a simple little dish I call Tomato Zucchini Gratin, which is basically layers of fresh sliced zucchini and tomatoes with fresh, minced garlic, olive oil, and herbs sprinkled in between the layers. Top with a basic cracker crumb and butter topping and bake for an hour at 350°. Yum!

Tomato Zucchini Gratin


design + development by kelly christine studio