
Can Jam Challenge #10
You guys, it’s been crazy around here. You KNOW I must be committed to this Can Jam challenge when I can barely find my shoes and definitely not my iron, but will not let you down without a recipe! We moved to this house a little less than a week ago and I did manage to keep a sharp eye out for my canners, jars, and canning paraphernalia. It was all rounded up somewhere between the garage, basement, and kitchen. Pictures will have to come later because I am just too darn exhausted to photograph any jam/jelly food porn for you today.
I have to admit I was a little disappointed in this month’s canning feature. Chili peppers? Really? I wanted apples, darn it! What is fall without apples! Apple Jelly, Apple Butter, Apple Pie Jam, Apple Chutney, Apple Sauce. APPLES, APPLES, APPLES! Wahhh!
Someone needs a nap, ya’ think?
But in the scope of things chili peppers do work. I’m now living somewhere that is actually cold during the month of October, so maybe a little capsaicin to heat things up is a good thing.
For this month’s challenge, there’s gold in them thar hills! Habanero Gold Jelly. I have literally sold cases of this jelly to friends, family, and admirers near and far. I’m pretty sure it’s a Ball recipe, and it’s a definite star on the Harvest Forum for sure. A few years ago, a few of my canning Jedi Masters put their beautiful heads together and scaled this recipe up to make more half pints. I think the original recipe only made 2 or 4 half pints, but this makes 6.
Big Batch Habanero Gold Jelly
Makes 6 half pints
1 cup minced dried apricots (1/8" dice)
Note: Could use dried peaches or pears instead.
1 1/4 total cups minced red sweet pepper and minced red onion (1/8" dice), approximately half-and-half.
1/4 cup Habanero peppers
Note: For extra-hot, increase Habaneros to 1/2 cup and reduce red sweet pepper/red onion combination to 1 cup total.
1 1/2 cups white vinegar
6 cups sugar
1 3-oz. pouch liquid pectin (I used Ball, which I've decided I like better than Certo.)
Prep apricots, peppers and onion. Place in a large, stainless or other non-reactive pot. Add sugar and vinegar. Bring to the boil and cook 5 minutes. Pull off the burner; allow to cool, cover and let sit overnight. Stir occasionally if convenient.
Note: 4-6 hours would be plenty, so the time doesn't need to be any greater than the soaking time for apricots in the original recipe.
Next day, bring the mixture back to the boil. Stir in liquid pectin. Boil hard 1 minute. Pull off the heat. If necessary, skim foam. (I did need to skim a bit.) Let cool 2 minutes, stirring to distribute solids. Pour into jars. Stir to distribute and remove air bubbles. Process in a BWB 10 minutes.
When jars are sealed, "agitate" to distribute solids throughout the jelly.
Friday, October 22, 2010


Wednesday, October 20, 2010
Leaf Peeping
This is my first time experiencing fall. I mean really living it instead of visiting it from far away. And I am loving every drizzly, frosty, fallen amber-leafed moment of it. I can’t get enough. No more acting like it’s fall in the middle of July.
 This past weekend, hubby and I took a self-indulgent, entire day away from unpacking boxes, climbing stairs, and wondering where the drinking glasses are to drive out to the Shenandoah National Park. It wasn’t quite the peak for leaf-peeping opportunities, but entirely breathless and beautiful all the same.
 Several years ago, I wrote a Ray Bradbury inspired poem about fall. I hope it inspires you to enjoy this wonderful season, wherever you are.
October
The month of burning leaves.
People bustled into dim houses carrying pumpkins and corn stalks.
Skeletons dancing, bats flying, candles flamed,
Apples swinging in empty doorways.
The acme of Horror.
The month of shadows and ghosts.
Triangle-eyed faces peer into empty October nights.
Masks leering in black attics and damp cellars.
Children giggling and vanishing off among a street of moaning trees.
I can almost see it, even in the scorch of July.
Sunday, October 17, 2010
How To Lose 10 Pounds In 10 Days While Eating Anything You Want!
It’s so simple! You’ll see the pounds melt away right before your eyes! All you have to do is follow these simple rules:
Rule 1: For the first 6 days of the diet, find a house 4 states away from your current residence, paint 3 rooms, and sealcoat the garage floor. Return home via a 14 hour train ride.
Rule 2: For the remaining 4 days of the diet, pack-up your entire household for relocation in 4 days or less. Return to new residence via a 14 hour train ride.
Rule 3: During this 10 day period, you may eat anything you want, as much as you want; however, limit yourself to eating once a day, preferably at a time in the evening when you are too exhausted to care.
Rule 4: Climb and descend the 2nd story and basement stairs no less than 1,492 times.
Rule 5: Limit yourself to no more than 5 hours of sleep per night.
Rule 6: Arrange for emergency carpet cleaning, air conditioning repair, and backup moving companies at a moment’s notice. Burn extra calories by keeping your adrenaline revved!
Disclaimer: Due to higher-than-average weather temperatures, residents of Southern California, Arizona, Florida, Texas, Louisiana, Mississippi, and Alabama will experience the best results from this diet.
Rule 1: For the first 6 days of the diet, find a house 4 states away from your current residence, paint 3 rooms, and sealcoat the garage floor. Return home via a 14 hour train ride.
Rule 2: For the remaining 4 days of the diet, pack-up your entire household for relocation in 4 days or less. Return to new residence via a 14 hour train ride.
Rule 3: During this 10 day period, you may eat anything you want, as much as you want; however, limit yourself to eating once a day, preferably at a time in the evening when you are too exhausted to care.
Rule 4: Climb and descend the 2nd story and basement stairs no less than 1,492 times.
Rule 5: Limit yourself to no more than 5 hours of sleep per night.
Rule 6: Arrange for emergency carpet cleaning, air conditioning repair, and backup moving companies at a moment’s notice. Burn extra calories by keeping your adrenaline revved!
Disclaimer: Due to higher-than-average weather temperatures, residents of Southern California, Arizona, Florida, Texas, Louisiana, Mississippi, and Alabama will experience the best results from this diet.
Saturday, September 25, 2010
The State of Things
How many girls can say their husband gave them the state of Virginia for their 40th birthday? Not many; I know. I’m lucky and very grateful.
Internets, friends, lovers, Maytag repairmen, I’ve been holding out on you. I am moving to Virginia! The big day is only weeks away, which seems like only days, hours, minutes. There are so many things to do!
Also, another secret…I haven’t worked since January of this year! Big reasons for that as well, but I will keep you on the edge of your seat until the time is right.
 You see, this has been in the works for months, but I didn’t want to announce it until the line was drawn in the sand. Hubby got a promotion with his company that is requiring us to relocate. Unfortunately, we are having to short-sale our house, which is a very big sore spot for us. We’ve had a contract on our house since April, with a buyer who is willing to pay $20k MORE than what the houses are going for in our neighborhood. We’ve already signed 3 extensions for a closing date, but still the banks drag on.
We can’t afford to pay 2 mortgages, and I don’t even want to entertain renting our house out of state. Every single house that has rented in our neighborhood has been trashed, causing the owners to invest even more money into their house to fix it up. If we lose our buyer due to the bank’s negligence, we are prepared to do what we need to do to move on with our lives to better jobs, communities, and opportunities.
It’s come down to a business decision, plain and simple.
Internets, friends, lovers, Maytag repairmen, I’ve been holding out on you. I am moving to Virginia! The big day is only weeks away, which seems like only days, hours, minutes. There are so many things to do!
Also, another secret…I haven’t worked since January of this year! Big reasons for that as well, but I will keep you on the edge of your seat until the time is right.
 You see, this has been in the works for months, but I didn’t want to announce it until the line was drawn in the sand. Hubby got a promotion with his company that is requiring us to relocate. Unfortunately, we are having to short-sale our house, which is a very big sore spot for us. We’ve had a contract on our house since April, with a buyer who is willing to pay $20k MORE than what the houses are going for in our neighborhood. We’ve already signed 3 extensions for a closing date, but still the banks drag on.
We can’t afford to pay 2 mortgages, and I don’t even want to entertain renting our house out of state. Every single house that has rented in our neighborhood has been trashed, causing the owners to invest even more money into their house to fix it up. If we lose our buyer due to the bank’s negligence, we are prepared to do what we need to do to move on with our lives to better jobs, communities, and opportunities.
It’s come down to a business decision, plain and simple.
Monday, September 13, 2010
Zesty Peach Barbeque Sauce
Can Jam Challenge #9
I remember the first time I made this sauce and spooned it over a home-roasted, pulled pork sandwich with a dollop of homemade cole slaw. I think I exclaimed, “Holy crap, this is GOOD!" although I may have used more colorful adjectives.
I remember the first time I made this sauce and spooned it over a home-roasted, pulled pork sandwich with a dollop of homemade cole slaw. I think I exclaimed, “Holy crap, this is GOOD!" although I may have used more colorful adjectives.
 I’m a sweet BBQ sauce southern girl, and this Zesty Peach Barbecue Sauce is just the ticket! It’s good over chicken, ribs, and would even serve as a wonderful dipping sauce for chicken fingers. It’s sweet, fruity, and has a tiny bit of heat, but I like it that way.
One thing I’ve noticed about many canning and preserving recipes is they all seem to have the same flavor profile in one form or another (cinnamon, allspice, mace, dill, peppercorns, etc.). I try to find different flavor combinations so it doesn’t feel like I have a gazillion jars of the same thing.
 Now I know that BBQ season is almost over, but peaches are at the end of their slurpy best right now, so don't miss out!
Zesty Peach Barbecue Sauce
Recipe Source: Ball Complete Book of Home Preserving
Yield: 8 half pints
6 cups finely chopped, pitted, peeled peaches
1 cup finely chopped, seeded red bell pepper
3 cup finely chopped onion
3 tablespoons finely chopped garlic
1 ¼ cups liquid honey
¾ cup cider vinegar
1 tablespoon Worcestershire sauce
2 teaspoons hot pepper flakes
2 teaspoons dry mustard
2 teaspoons canning salt
In a large, stainless steel saucepan, combine peaches, red bell pepper, onion, garlic, honey, vinegar, Worcestershire sauce, hot pepper flakes, mustard, and salt. Bring to a boil over medium-high heat. Reduce heat to a light boil/simmer, stirring frequently, until mixture is thickened to the consistency of a thin commercial barbecue sauce, about 25 minutes.
Ladle hot sauce into prepared canning jars, leaving ½ headspace. Process jars in a BWB for 15 minutes.
Tuesday, September 07, 2010
Green Is Beautiful
I am in love, love, luuurve with this Basil Vinaigrette recipe I found on Simply Recipes the other day. Like most of you, I have TONS of basil growing in my garden right now, which require frequent harvesting before they get leggy.

I boiled up some chopped, golden potatoes and drizzled this green jewel of scrumptiousness over them while they were still warm. Total HEAVEN!
Basil Vinaigrette Recipe
Recipe Source: Simply Recipes
Ingredients
1 teaspoon Dijon mustard
1 shallot, chopped
1/2 teaspoon salt
1 teaspoon sugar
1/2 cup roughly chopped basil leaves
1/4 cup white wine vinegar
3/4 cup olive oil
Method
Place the salt, sugar, mustard, shallot and basil in a blender or food processor. Pulse several times to combine. Scrape the sides of the blender down with a spatula. Add the vinegar and pulse again.
Turn the blender on low and take off the cap in the center of the blender’s lid. Slowly pour in the olive oil. It may sputter a little out of the open cap, so hold you hand over it to minimize splashing.
When the olive oil is incorporated, turn off the blender and scrape the sides down one more time. Cover and purée everything for 1-2 minutes.
Store covered in the fridge for up to a week.
Makes a little more than one cup.

I boiled up some chopped, golden potatoes and drizzled this green jewel of scrumptiousness over them while they were still warm. Total HEAVEN!
Basil Vinaigrette Recipe
Recipe Source: Simply Recipes
Ingredients
1 teaspoon Dijon mustard
1 shallot, chopped
1/2 teaspoon salt
1 teaspoon sugar
1/2 cup roughly chopped basil leaves
1/4 cup white wine vinegar
3/4 cup olive oil
Method
Place the salt, sugar, mustard, shallot and basil in a blender or food processor. Pulse several times to combine. Scrape the sides of the blender down with a spatula. Add the vinegar and pulse again.
Turn the blender on low and take off the cap in the center of the blender’s lid. Slowly pour in the olive oil. It may sputter a little out of the open cap, so hold you hand over it to minimize splashing.
When the olive oil is incorporated, turn off the blender and scrape the sides down one more time. Cover and purée everything for 1-2 minutes.
Store covered in the fridge for up to a week.
Makes a little more than one cup.
Tuesday, August 24, 2010
Give Me A Hand
So, what’s the difference between a bunch and a hand of bananas?
See, this is why I’ve (mostly) stopped drinking coffee. I end up Googling obscure, useless information that will be permanently burned into my brain forever. But on the brighter side, this gives me awesome mingling skills at parties!
But mostly people think I’m some kind of nerd. Anyway…

My next door neighbor brought me this GORGEOUS piece of edible art yesterday and I almost don’t want to touch it. Almost. I had two of the ripened ones yesterday for a snack as I was doing yard work and I was surprised to find that they didn’t really taste like bananas at all. They had more of a neutral, fruity flavor, with maybe just a hint of “banana-ness” and their texture was meatier than the marshmallowy bananas you find at the store. In my opinion, they were exactly what a banana should be.
I don’t know what kind they are, but I know my husband and I will eat every single one!
See, this is why I’ve (mostly) stopped drinking coffee. I end up Googling obscure, useless information that will be permanently burned into my brain forever. But on the brighter side, this gives me awesome mingling skills at parties!
But mostly people think I’m some kind of nerd. Anyway…

My next door neighbor brought me this GORGEOUS piece of edible art yesterday and I almost don’t want to touch it. Almost. I had two of the ripened ones yesterday for a snack as I was doing yard work and I was surprised to find that they didn’t really taste like bananas at all. They had more of a neutral, fruity flavor, with maybe just a hint of “banana-ness” and their texture was meatier than the marshmallowy bananas you find at the store. In my opinion, they were exactly what a banana should be.
I don’t know what kind they are, but I know my husband and I will eat every single one!
Friday, August 20, 2010
Chunky Basil Pasta Sauce
Can Jam Challenge #8
The thing about canning and preserving is when you first start out, you put up almost anything you can get your hands on. After a while, you finally realize and say to yourself, “What am I gonna do with 20 jars of hot-dog relish?” That’s where friends come in, right?
Eventually, even your friends are like, “What am I gonna do with all this hot-dog relish?” So, over time you learn to make the recipes you REALLY like and use regularly, and just as importantly, the ones your friends REALLY like too.

There are a gazillion recipes out there for home-canned tomato sauce, but I really like this one from "The Complete Book of Small-Batch Preserving"; I’ve talked about it before. I’ve used this sauce on pasta, in soups, pizza, even pot-roasts.
It’s a very versatile and delicious sauce, and only the most tasty and cherished home-grown tomatoes get the honor of being used to make it. I don't even bother making other tomato sauces because this is so good!

It's so hard to come by a really good, honest-to-god homegrown tomato down here unless you grow it yourself, which is what I do, twice a year. One of these days, when I have tomatoes to spare (is that even possible?), I'm gonna have to be a little more adventurous!
Chunky Basil Pasta Sauce
Recipe Source: The Complete Book of Small-Batch Preserving
Yield: 8 cups
8 cups (2 L) coarsely chopped, peeled tomatoes (about 9-12 tomatoes)
1 cup chopped onion
3 cloves garlic
2/3 cup red wine
1/3 cup red wine vinegar (5 % strength)
1/2 cup chopped fresh basil
1 tablespoon chopped fresh parsley
1 teaspoon pickling salt
1/2 teaspoon granulated sugar
1 6-oz/156 mL) can tomato paste
Combine tomatoes, onion, garlic, wine, vinegar, basil, parsley, salt, sugar and tomato paste in a very large non-reactive pan. Bring to a boil over high heat, reduce heat to low and simmer, uncovered, for 40 minutes or until mixture reaches desired consistency, stirring frequently.
Remove hot jars from canner and ladle sauce into jars to within 1/2 inch (1 cm) of rim (head space). Process 35 minutes for pint (500 mL) jars and 40 minutes for quart (1 L) jars in a BWB.
The thing about canning and preserving is when you first start out, you put up almost anything you can get your hands on. After a while, you finally realize and say to yourself, “What am I gonna do with 20 jars of hot-dog relish?” That’s where friends come in, right?
Eventually, even your friends are like, “What am I gonna do with all this hot-dog relish?” So, over time you learn to make the recipes you REALLY like and use regularly, and just as importantly, the ones your friends REALLY like too.

There are a gazillion recipes out there for home-canned tomato sauce, but I really like this one from "The Complete Book of Small-Batch Preserving"; I’ve talked about it before. I’ve used this sauce on pasta, in soups, pizza, even pot-roasts.
It’s a very versatile and delicious sauce, and only the most tasty and cherished home-grown tomatoes get the honor of being used to make it. I don't even bother making other tomato sauces because this is so good!

It's so hard to come by a really good, honest-to-god homegrown tomato down here unless you grow it yourself, which is what I do, twice a year. One of these days, when I have tomatoes to spare (is that even possible?), I'm gonna have to be a little more adventurous!
Chunky Basil Pasta Sauce
Recipe Source: The Complete Book of Small-Batch Preserving
Yield: 8 cups
8 cups (2 L) coarsely chopped, peeled tomatoes (about 9-12 tomatoes)
1 cup chopped onion
3 cloves garlic
2/3 cup red wine
1/3 cup red wine vinegar (5 % strength)
1/2 cup chopped fresh basil
1 tablespoon chopped fresh parsley
1 teaspoon pickling salt
1/2 teaspoon granulated sugar
1 6-oz/156 mL) can tomato paste
Combine tomatoes, onion, garlic, wine, vinegar, basil, parsley, salt, sugar and tomato paste in a very large non-reactive pan. Bring to a boil over high heat, reduce heat to low and simmer, uncovered, for 40 minutes or until mixture reaches desired consistency, stirring frequently.
Remove hot jars from canner and ladle sauce into jars to within 1/2 inch (1 cm) of rim (head space). Process 35 minutes for pint (500 mL) jars and 40 minutes for quart (1 L) jars in a BWB.
Friday, July 23, 2010
Roasted Corn and Zucchini Salsa
Can Jam Challenge #7
Well, I figured there was going to be a whole lotta’ pickling going on for this month’s Can Jam Challenge, so here’s a little something different.
Since I’m in Florida, our pickling season was month’s ago and local cukes are long gone. I’ve mentioned my pickling trials and tribulations here, here, and here. Good pickle-making is a gift and every year it’s a new challenge. We’re already up to our armpits in pickles, so this month is salsa.

I’ve made this salsa before and it’s pretty good. It's not as good as Annie’s Salsa, but it’s a different spin. The original recipe results came out tasting more like a relish, so I’ve added a few things I thought would give it more of a flavor profile without jeopardizing safety. It can also be served on top of grilled chicken breasts or fish, plus it uses some the hot-to-trot produce that’s in season right now: sweet corn and zucchini.
Kathy's Roasted Corn and Zucchini Salsa
Recipe Modified from: "Preserving the Harvest"
Makes 8 pints
6 medium zucchini, cleaned, trimmed and diced
4 teaspoons canning salt
*4 ears of yellow or sweet corn, husked, silks removed (2 cups of kernels)
3 tablespoons olive oil
4 medium tomatoes, seeded and chopped
2 cups fresh lime juice (or bottled)
1 cup cider vinegar
4 jalapeno chiles, seeded and minced
½ cup minced red onion
6 cloves garlic, minced
1 teaspoon freshly ground pepper
1 teaspoon sugar
1 teaspoon canning salt
1 teaspoon ground cumin
*Note: Good, quality frozen corn kernels work fine.
Toss the zucchini with the salt and “sweat” for about 30 minutes in a non-reactive colander. Rinse and drain well.
Preheat the oven to 400°. Coat the corn with olive oil and roast on a cookie sheet for 30-40 minutes. Cool. Cut off the kernels and scrape the cobs. If using frozen, defrost corn in the microwave, drain, spread on a cookie sheet, drizzle with olive oil, and roast. Be careful not to burn the corn, you just want it to lightly brown. If over-cooked, the corn will turn out tough and chewy.
Combine the zucchini, corn, tomatoes, lime juice, vinegar, jalapenos, onion, garlic, and remaining spices in a heavy saucepan. Bring to a boil, then simmer and cook for about 20 minutes, stirring frequently, until thickened.
Ladle into hot, prepared canning jars with ½ inch headspace. Process in a BWB for 15 minutes.
Well, I figured there was going to be a whole lotta’ pickling going on for this month’s Can Jam Challenge, so here’s a little something different.
Since I’m in Florida, our pickling season was month’s ago and local cukes are long gone. I’ve mentioned my pickling trials and tribulations here, here, and here. Good pickle-making is a gift and every year it’s a new challenge. We’re already up to our armpits in pickles, so this month is salsa.

I’ve made this salsa before and it’s pretty good. It's not as good as Annie’s Salsa, but it’s a different spin. The original recipe results came out tasting more like a relish, so I’ve added a few things I thought would give it more of a flavor profile without jeopardizing safety. It can also be served on top of grilled chicken breasts or fish, plus it uses some the hot-to-trot produce that’s in season right now: sweet corn and zucchini.
Kathy's Roasted Corn and Zucchini Salsa
Recipe Modified from: "Preserving the Harvest"
Makes 8 pints
6 medium zucchini, cleaned, trimmed and diced
4 teaspoons canning salt
*4 ears of yellow or sweet corn, husked, silks removed (2 cups of kernels)
3 tablespoons olive oil
4 medium tomatoes, seeded and chopped
2 cups fresh lime juice (or bottled)
1 cup cider vinegar
4 jalapeno chiles, seeded and minced
½ cup minced red onion
6 cloves garlic, minced
1 teaspoon freshly ground pepper
1 teaspoon sugar
1 teaspoon canning salt
1 teaspoon ground cumin
*Note: Good, quality frozen corn kernels work fine.
Toss the zucchini with the salt and “sweat” for about 30 minutes in a non-reactive colander. Rinse and drain well.
Preheat the oven to 400°. Coat the corn with olive oil and roast on a cookie sheet for 30-40 minutes. Cool. Cut off the kernels and scrape the cobs. If using frozen, defrost corn in the microwave, drain, spread on a cookie sheet, drizzle with olive oil, and roast. Be careful not to burn the corn, you just want it to lightly brown. If over-cooked, the corn will turn out tough and chewy.
Combine the zucchini, corn, tomatoes, lime juice, vinegar, jalapenos, onion, garlic, and remaining spices in a heavy saucepan. Bring to a boil, then simmer and cook for about 20 minutes, stirring frequently, until thickened.
Ladle into hot, prepared canning jars with ½ inch headspace. Process in a BWB for 15 minutes.
Sunday, July 11, 2010
Panic at The Disco
I haven't been around here these past two weeks because I've had my hands full with these two little stinkers.
Meet Chuck and Dave:
 I'm fostering them until they can get adopted. I told my friend, "Sure, I'd LOVE to foster a kitten or two," thinking I have cute little kitten cuddles, and play time, and purring.
NOT!
I ended up with two feral kittens who where trapped who knows where in the wild. When I got them 2 weeks ago, they had pretty much every parasite that could be tested for on a cat: coccidia, giardia, toxoplasmosis, and a whole host of other "swimmers." Plus they had conjuctivitis, and a highly contagious type of mite to HUMANS! Oh, and one of them also has cerebral hypoplasia.
They were very sick kitties!
So, the past two weeks have been full of god-awful, death-smelling diarrhea, sanitizing, administering 4 meds daily, and mite baths. On top of all that, these babies are wild, so they are pretty much FCUK YOU LADY!
The good news, is they are getting healthier every day. I've never been so obsessed about the consistency of cat shit in my whole life. They are warming up to the thought of treats, and chin scratches, and lap time. I know somewhere, I am banking karma points.
Meet Chuck and Dave:
 I'm fostering them until they can get adopted. I told my friend, "Sure, I'd LOVE to foster a kitten or two," thinking I have cute little kitten cuddles, and play time, and purring.
NOT!
I ended up with two feral kittens who where trapped who knows where in the wild. When I got them 2 weeks ago, they had pretty much every parasite that could be tested for on a cat: coccidia, giardia, toxoplasmosis, and a whole host of other "swimmers." Plus they had conjuctivitis, and a highly contagious type of mite to HUMANS! Oh, and one of them also has cerebral hypoplasia.
They were very sick kitties!
So, the past two weeks have been full of god-awful, death-smelling diarrhea, sanitizing, administering 4 meds daily, and mite baths. On top of all that, these babies are wild, so they are pretty much FCUK YOU LADY!
The good news, is they are getting healthier every day. I've never been so obsessed about the consistency of cat shit in my whole life. They are warming up to the thought of treats, and chin scratches, and lap time. I know somewhere, I am banking karma points.
Thursday, June 24, 2010
Bruised Ego Jam
Can Jam Challenge #6
This month's Can Jam Challenge brings you a fairy tale full of promise and disappointment. Enjoy.

nce upon at time, there was a bee-yoooo-tiful princess who decided one day to collect fresh berries from the forest (okay, a swampy area next to an office building in a business park). The princess knew there was a very rare and secret patch of blackberry bushes that had given her delicious berries in the past, but the harvest was always too small. But a very cold winter and a warm spring had made this year’s blackberry bushes heavy with fruit, and the princess was off to gather the bounty.
After she had collected the luscious, wild blackberries, the beautiful princess wondered what she would do with them. Surely since these were no ordinary berries, they deserved something special and magical. “I know,” she thought “I will ask the fairy Godmother Christine Ferber for guidance!” So, the princess summoned the fairy Godmother and was lead to a recipe of fresh blackberry and blueberry jam. “Oh, how delicious!” exclaimed the princess, “I will make it at once.”

The princess followed the fairy Godmother’s recipe directions exactly. “This is going to be the most scrumptious jam the kingdom has ever tasted,” thought the princess. She envisioned dark, jeweled jars filled with the delicious jam, and how the very taste of it would make the prince fall in love with her over, and over again (okay, my awesome husband).
Suddenly, at the very last moment, two evil sock serpents appeared and whispered in the princess’ ear, “Cook the jam to 240° versus 220°….trussssst ussssss.” The princess was confused and in haste, she cooked the jam at the higher temperature. Immediately, the princess knew there was something wrong. The beautiful jam had become sticky and tough. The once beautiful blackberries were sort of crunchy!

The princess wept and cursed a streak of obscenities that would make a sailor blush. “All that work! All that time! Those beautiful berries are ruined!” she cried. The jam was so terrible, that the princess didn’t even bother processing it in the jars. She left the jars on the kitchen counter as a sad reminder of how important it is to double-check jam processing instructions, even if you have done it a million times.
The End.
This month's Can Jam Challenge brings you a fairy tale full of promise and disappointment. Enjoy.

nce upon at time, there was a bee-yoooo-tiful princess who decided one day to collect fresh berries from the forest (okay, a swampy area next to an office building in a business park). The princess knew there was a very rare and secret patch of blackberry bushes that had given her delicious berries in the past, but the harvest was always too small. But a very cold winter and a warm spring had made this year’s blackberry bushes heavy with fruit, and the princess was off to gather the bounty.
After she had collected the luscious, wild blackberries, the beautiful princess wondered what she would do with them. Surely since these were no ordinary berries, they deserved something special and magical. “I know,” she thought “I will ask the fairy Godmother Christine Ferber for guidance!” So, the princess summoned the fairy Godmother and was lead to a recipe of fresh blackberry and blueberry jam. “Oh, how delicious!” exclaimed the princess, “I will make it at once.”

The princess followed the fairy Godmother’s recipe directions exactly. “This is going to be the most scrumptious jam the kingdom has ever tasted,” thought the princess. She envisioned dark, jeweled jars filled with the delicious jam, and how the very taste of it would make the prince fall in love with her over, and over again (okay, my awesome husband).
Suddenly, at the very last moment, two evil sock serpents appeared and whispered in the princess’ ear, “Cook the jam to 240° versus 220°….trussssst ussssss.” The princess was confused and in haste, she cooked the jam at the higher temperature. Immediately, the princess knew there was something wrong. The beautiful jam had become sticky and tough. The once beautiful blackberries were sort of crunchy!

The princess wept and cursed a streak of obscenities that would make a sailor blush. “All that work! All that time! Those beautiful berries are ruined!” she cried. The jam was so terrible, that the princess didn’t even bother processing it in the jars. She left the jars on the kitchen counter as a sad reminder of how important it is to double-check jam processing instructions, even if you have done it a million times.
The End.
Tuesday, June 22, 2010
Loafing Around
I made this bread the night before last and it was all I could do to keep myself from tearing into it right out of the oven.
I lasted 20 minutes.
I lasted 20 minutes.

I know you're "supposed" to wait until a fresh-baked loaf of bread cools before slicing (as escaping steam will cause the loaf to dry out), but sometimes YOU CAN'T HELP YOURSELF.
I loves me some Ina!
Honey White Bread
Recipe source: Barefoot Contessa At Home
1/2 cup warm water
2 packages dry yeast
1 teaspoon sugar
1 1/2 cups warm whole milk (110 degrees)
6 tablespoons butter (3/4 stick)
1 1/2 tablespoons honey
2 extra large or large egss, separated
5 to 6 cups AP flour
1 tablespoon salt
Place water in the bowl of an electric mixer fitted with a dough hook attachment. If the bowl is cold, be sure the water temp does not drop below 110 degrees. Add the yeast and sugar; stir and allow them to dissolve for 5 minutes.
Add the milk, butter, and honey. Mix on med-speed until blended. Add the egg yolks, 3 cups of the flour, and the salt. Mix on low speed for about 5 minutes. With the mixer still on low speed, add 2 more cups of flour. Raise the speed to med and slowly add just enough of the remaining flour so the dough doesn't stick to the bowl. Knead on med speed for about 8 minutes, adding flour as necessary.
Dump the dough out onto a floured surface and knead by hand for a minute, until the dough is smooth and elastic (I didn't need to do this...I just let the mixer do the work). Grease a bowl with butter, put the dough in the bowl, then turn it over so the top is slightly buttered. Cover the bowl with a damp towel and allow to rise for 1 hour, until doubled in volume.
Grease two 9 X 5-inch loaf pans with butter. Divide the dough into half, roll each half into a loaf shape and place each in a prepared pan. Cover again with the damp towel, and allow to rise again for an hour, until doubled in volume.
Preheat the oven at 350°. When the dough is ready, brush the tops with the egg white and bake the breads for 40-45 min, until they sound hollow when tapped. Turn them out of the pans and cool completely on a wire rack before slicing.

Friday, June 18, 2010
Kool-Aid Pickles: Oh, Yeah!
Can you handle one more pickle post? I think so!
So, I was wandering around the internets last week looking for information on calcium chloride, when I came across a recipe for Kool-Aid Pickles.
So, I was wandering around the internets last week looking for information on calcium chloride, when I came across a recipe for Kool-Aid Pickles.

Abomination? Food science geekery? Pure genius?
Apparently, they are a deep, deep, I mean DEEP Southern delicacy. I'm talking Mississippi Delta here people! They're a bit like the concept for fried green tomatoes or boiled peanuts: you either love them or are disgusted immediately.
From what I've read, kids looooove them, and I must admit they are addicting. They're messy (think red Kool-Aid on white carpet) and taste a lot like cherry flavored bread-and-butter pickles. Wouldn't these be great to serve at a Halloween party?
Behold: One of the rare times I will actually purchase a jar of pickles from the store (just in case this was a flop...can't waste good, homemade pickles!)...

Kool-Aid Pickles
1, 46-oz. jar of Kosher pickles (whole)
*2 small packs of Kool-Aid powder
2 cups warm water
1 cup sugar
Open the pickle jar and dump the brine. Remove pickles and slice each pickle in half lengthwise. Pack pickles back in jar. Mix warm water, Kool-Aid, and sugar together; stir until the sugar is dissolved. Pour Kool-Aid mixture over pickles. Cap the pickle jar and place in the refrigerator for 24 hours. For more flavor, leave pickles in brine for several days.
*Note: I used Cherry flavored Kool-Aid, as that seemed to be the most highly rated flavor, but feel free to experiment with other flavors. I've heard lemon-lime is also good, but grape is yuck!

Tuesday, June 15, 2010
The Perfect Pickle
Friends, lovers, Maytag Repairmen, I present to you The Perfect Pickle!
Cue the singing angels now…
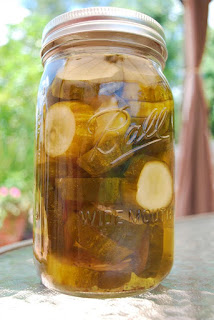 It has taken me 4 years to get to this point. Great pickles, even simply good pickles require a delicate balance of three elements: brine, salt, and crunch. Technically, you could say it’s just two elements because salt is an element of the brine, but I digress.
If any one of those elements are not just right, then it’s all for naught. The frustrating part is you never know if you have a good pickle or a lousy pickle until they age a little bit. By that time, pickling cuke season is over and you have to wait till next year to try again. In the meantime, you’re stuck with a gazillion jars of meh.
These pickles are ready to eat in about a week. Trust me...you won't be able to stop once you start!
Kathy’s Perfect Bread and Butter Pickles
Recipe modified from: The Joy of Pickling
Makes 6 quarts
5-6 pounds pickling cukes
8 cups cider vinegar
6 cups sugar
1 tsp celery seeds
*1/3 to ½ cup pickling salt
10-12 cinnamon sticks, broken in half
¼ cup whole allspice berries
1 tablespoon whole cloves
7-9 teaspoons calcium chloride (aka Pickle Crisp), optional
*Note: Start with 1/3 cup and add salt to taste. I ended up using ½ cup.
Wash cukes and remove the blossom ends. Cut cukes into large slices/chunks. Set aside.
In a large pot, combine vinegar, sugar, celery seeds, and salt to taste. Combine spices and tie up in a cheesecloth sachet or large, metal teaball. Add spice sachet to brine and bring brine to a boil. Lower temperature and simmer for 30 minutes. After 30 minutes, remove spice sachet and set aside. Add sliced cucumbers to the brine and slowly bring back to a boil.
Once reaching a boil, remove brine with cucumbers from stove and add calcium chloride; stir well. Using a slotted spoon, pack cucumber into prepared jars, adding 1 allspice berry and 2 cloves to each jar from the spice sachet. Ladle hot brine in jars, leaving ½ inch headspace.
Process jars in a BWB for 10 minutes.
Cue the singing angels now…
It has taken me 4 years to get to this point. Great pickles, even simply good pickles require a delicate balance of three elements: brine, salt, and crunch. Technically, you could say it’s just two elements because salt is an element of the brine, but I digress.If any one of those elements are not just right, then it’s all for naught. The frustrating part is you never know if you have a good pickle or a lousy pickle until they age a little bit. By that time, pickling cuke season is over and you have to wait till next year to try again. In the meantime, you’re stuck with a gazillion jars of meh.
These pickles are ready to eat in about a week. Trust me...you won't be able to stop once you start!
Kathy’s Perfect Bread and Butter Pickles
Recipe modified from: The Joy of Pickling
Makes 6 quarts
5-6 pounds pickling cukes
8 cups cider vinegar
6 cups sugar
1 tsp celery seeds
*1/3 to ½ cup pickling salt
10-12 cinnamon sticks, broken in half
¼ cup whole allspice berries
1 tablespoon whole cloves
7-9 teaspoons calcium chloride (aka Pickle Crisp), optional
*Note: Start with 1/3 cup and add salt to taste. I ended up using ½ cup.
Wash cukes and remove the blossom ends. Cut cukes into large slices/chunks. Set aside.
In a large pot, combine vinegar, sugar, celery seeds, and salt to taste. Combine spices and tie up in a cheesecloth sachet or large, metal teaball. Add spice sachet to brine and bring brine to a boil. Lower temperature and simmer for 30 minutes. After 30 minutes, remove spice sachet and set aside. Add sliced cucumbers to the brine and slowly bring back to a boil.
Once reaching a boil, remove brine with cucumbers from stove and add calcium chloride; stir well. Using a slotted spoon, pack cucumber into prepared jars, adding 1 allspice berry and 2 cloves to each jar from the spice sachet. Ladle hot brine in jars, leaving ½ inch headspace.
Process jars in a BWB for 10 minutes.
Thursday, June 10, 2010
Tomato Harvest
While the rest of the country is just getting warmed up for summer produce, Florida has already finished its tomato, cucumber, and corn season for the spring. June brings us fresh blueberries, and the rest of the summer is pretty much survival of the fittest. The good news is we get to do this all over again in about 4 months.
 I often compare our summers to winter up north. Locals get smart and huddle inside away from the heat of the day and scorching sun. We know better. We save our “inside projects” for the summer when the weather outside is unbearable. During cooler months, it’s hard to keep a Floridian inside for 10 minutes.
See, just like Northerners. We’re just flip-flopped!
My tomato harvest this spring was very successful. I only grow about 8-10 plants and that’s plenty for the two of us. I’ve played around for the past couple of seasons by not keeping track of what I was growing, but last fall and this spring I kept notes. This season I planted Better Boy and was very happy. I grow only in containers as I have found the plants do much better this way. I have more control over their water content, fertilizer, and pest control. I also found I’ve had no incidents (knock-on-wood) with four-legged critters when growing maters in pots.
Anyway, the best thing to do with a tomato is eat it fresh! My preference is sliced with fresh basil, mozzarella, good olive oil, and a sprinkle of sea salt and pepper. But I also adore a simple little dish I call Tomato Zucchini Gratin, which is basically layers of fresh sliced zucchini and tomatoes with fresh, minced garlic, olive oil, and herbs sprinkled in between the layers. Top with a basic cracker crumb and butter topping and bake for an hour at 350°. Yum!

Wednesday, May 26, 2010
Hot Turtle Love
Last year, I suspected that Barry the Boxturtle might be a Barbara when I spotted him laying eggs. Yah think???
But there was a part of me that said, "Wait a minute, could it be that we have TWO resident turtles?" And this past weekend pretty much confirmed there is indeed a Barry and a Barbara.
Get a room you two!

But there was a part of me that said, "Wait a minute, could it be that we have TWO resident turtles?" And this past weekend pretty much confirmed there is indeed a Barry and a Barbara.
Get a room you two!
Wednesday, May 19, 2010
Pickled Asparagus (Again)
Can Jam Challenge #5
I don’t know what the heck happened to the asparagus this season. Usually, asparagus is $3.99 a pound or HIGHER in Florida, comes from Peru, and tastes like shoelaces. But there’s a small window of opportunity every spring where I can buy it for around $1.49 a pound and I could even drive to where it was grown. It would be a long drive, but I digress.
But this year, NADA. Nature’s french-fries never dropped below $2.50 this year and I was lucky if they came from California. Mostly, it stayed around $3 and up per pound in all my groceries. And there’s no such thing as a “farmers market” that sells organic or local asparagus in Florida.
Ahem.
What the heck happened? Was it the hard winter? Are farmers not growing the stuff? Was there a disease or insect problem? Is there a cycle on production?
And I don’t even want to GO THERE on rhubarb. There was ‘nar a stalk to be found in any of the groceries, and the one rare glimpse I did see, wrapped in styrofoam and cellophane, cost around $7.00 for 5 STALKS!!!
Plus, I don’t like the stuff, so that’s no big loss for me (hee-hee).

So, in keeping with the sprit of local and available ingredients, I’m afraid this month’s Can Jam Challenge will contain a visit from the ghost of post’s past. Besides, I can’t think of anything I would rather do when preserving asparagus than pickle it. It’s my favorite.
Until next year, I guess I’ll have to pickle more cukes!
Pickled Asparagus
Recipe source: The Joy of Pickling
Makes 5, 12 oz. jars
3 lbs of fresh asparagus (sometimes I need more or less, depending on spear thickness)
5 garlic cloves, peeled
15 allspice berries
50 black peppercorn berries
20 coriander seeds
Red pepper flakes
Nutmeg
2 ½ cups white wine vinegar
2 ½ cups water
2 ½ tsp canning salt
2 T sugar
Trim asparagus to fit inside canning jars, giving ½ inch of space from the tip of the spears to the top of the jar. Prepare jars for hot water bath canning. In a saucepot, mix vinegar, water, salt, and sugar; bring to a boil. When brine has boiled, fill each hot jar with 1 garlic clove, 3 allspice berries, 10 black peppercorns, 4 coriander seeds, a dash or two of the red pepper flakes, and a pinch of nutmeg. Fill jars with asparagus spears, tips up, till comfortably full without packing. Ladle brine into jars, giving ½ inch headspace; top jars with prepared lids, then process in a boiling water bath for 10 minutes. Wait 4-6 weeks before eating.
**Note: If you don't want to process for canning, just pour the hot brine over the asparagus and keep in the refridgerator.
I don’t know what the heck happened to the asparagus this season. Usually, asparagus is $3.99 a pound or HIGHER in Florida, comes from Peru, and tastes like shoelaces. But there’s a small window of opportunity every spring where I can buy it for around $1.49 a pound and I could even drive to where it was grown. It would be a long drive, but I digress.
But this year, NADA. Nature’s french-fries never dropped below $2.50 this year and I was lucky if they came from California. Mostly, it stayed around $3 and up per pound in all my groceries. And there’s no such thing as a “farmers market” that sells organic or local asparagus in Florida.
Ahem.
What the heck happened? Was it the hard winter? Are farmers not growing the stuff? Was there a disease or insect problem? Is there a cycle on production?
And I don’t even want to GO THERE on rhubarb. There was ‘nar a stalk to be found in any of the groceries, and the one rare glimpse I did see, wrapped in styrofoam and cellophane, cost around $7.00 for 5 STALKS!!!
Plus, I don’t like the stuff, so that’s no big loss for me (hee-hee).
So, in keeping with the sprit of local and available ingredients, I’m afraid this month’s Can Jam Challenge will contain a visit from the ghost of post’s past. Besides, I can’t think of anything I would rather do when preserving asparagus than pickle it. It’s my favorite.
Until next year, I guess I’ll have to pickle more cukes!
Pickled Asparagus
Recipe source: The Joy of Pickling
Makes 5, 12 oz. jars
3 lbs of fresh asparagus (sometimes I need more or less, depending on spear thickness)
5 garlic cloves, peeled
15 allspice berries
50 black peppercorn berries
20 coriander seeds
Red pepper flakes
Nutmeg
2 ½ cups white wine vinegar
2 ½ cups water
2 ½ tsp canning salt
2 T sugar
Trim asparagus to fit inside canning jars, giving ½ inch of space from the tip of the spears to the top of the jar. Prepare jars for hot water bath canning. In a saucepot, mix vinegar, water, salt, and sugar; bring to a boil. When brine has boiled, fill each hot jar with 1 garlic clove, 3 allspice berries, 10 black peppercorns, 4 coriander seeds, a dash or two of the red pepper flakes, and a pinch of nutmeg. Fill jars with asparagus spears, tips up, till comfortably full without packing. Ladle brine into jars, giving ½ inch headspace; top jars with prepared lids, then process in a boiling water bath for 10 minutes. Wait 4-6 weeks before eating.
**Note: If you don't want to process for canning, just pour the hot brine over the asparagus and keep in the refridgerator.
Thursday, May 13, 2010
Garden Snacks!
The garden is back to its beautiful prime, including these adorable, little tomatoes I call my "garden snacks." I don't plant these; they grow willy-nilly every year, but mostly concentrate in one area of the garden. I snack on them as I go about pulling weeds, trimming this or that. They're smaller than typical grape tomatoes and they're delicious!

I received the mother plants as a gift in a plant swap years ago at Seminole Springs Nursery. I wish I remembered the name of who gave them to me. All I remember was his name was Tom and something about "friends-don't-let-friends-plant-Tom's-Tomatoes," and here we are.
Every year they sprout up on their own and I laugh. For the longest time, I couldn't grow tomatoes and these babies popped up without any help. They're a welcome, cheerful, and tasty gift that keeps on giving!
I received the mother plants as a gift in a plant swap years ago at Seminole Springs Nursery. I wish I remembered the name of who gave them to me. All I remember was his name was Tom and something about "friends-don't-let-friends-plant-Tom's-Tomatoes," and here we are.
Every year they sprout up on their own and I laugh. For the longest time, I couldn't grow tomatoes and these babies popped up without any help. They're a welcome, cheerful, and tasty gift that keeps on giving!
Tuesday, May 11, 2010
Apple Cider and Rosemary Ice Pops
I cannot begin to explain how much I LOVE these popsicles! They are so refreshing and tasty I have to really try hard to only eat just one per day.
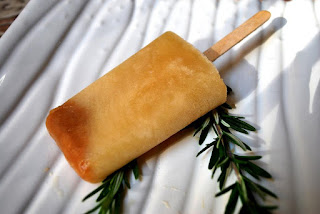
Remember that little comment I made about summer being just around the corner? Well it’s here and these popsicles will definitely keep you cool. These would be perfect as a dessert for a grown-up barbeque or summer dinner.
Apple Cider and Rosemary Ice Pops
Recipe Source: Bon Appetit
4 cups apple juice or cider
½ cup water
½ cup sugar
2 tablespoons chopped fresh rosemary
1 cinnamon stick, broken in half
2 whole cloves
4 teaspoons apple cider vinegar
¼ teaspoon vanilla extract
Combine apple juice, water, sugar, rosemary, and spices in a saucepan and heat medium-high, till mixture reaches a boil. Reduce temperature to a light simmer and reduce mixture to 3 ½ cups, 20 to 25 minutes. Strain into a 4-cup measuring cup and cool to room temperature. Stir in vinegar and extract. Pour into popsicle molds and freeze overnight or till set.
Wednesday, May 05, 2010
The Good and The Bad - Part II
 I’m not sure you can tell in the picture, but that is a bathtub FULL OF CUCUMBERS.
A couple of years ago, I learned the hard way that pickling season in Florida does not equal the same pickling season for the rest of the country. At the time, I experimented with a fermented pickle recipe, which required several days of open air fermenting, adding new brine, and skimming scum.
All my pickle peeps were claiming these pickles were the bee’s knees, so I promptly went out and picked up 3 bushels of fresh cukes. I was anxious to have quarts and quarts of delicious, home-fermented dill pickles, so I gave it a shot.
Now, by the time early-season cukes are ready in Florida (May), the weather is already on the verge of hot-as-balls. As of this past weekend, the temps were already in the mid-to-upper 90’s, so you can imagine what temperatures like this can do to fermenting cucumbers. After the third day of my “pickle experiment,” my husband and I walked into the house to a smell that resembled fresh road kill and rotting vegetables. The fruit flies were having a party, and we weren’t invited.
 It took many trips to the compost pile and many hours of cleaning, scrubbing, and disinfecting to clean up the mess. Now, several years later, I know that fermenting vegetables require very COOL temps, and we have a very short, if any, window of opportunity in the Sunshine State. I did; however, successfully make some awesome sauerkraut this past winter!
Pickle season is upon us again, and I am looking forward to another stab at making the perfect pickle. I’m almost there!
Subscribe to:
Posts (Atom)


 Posts
Posts

