Tuesday, July 29, 2014

July In The Garden

This is the time of year where my canner, the dishwasher, the washing machine, and our compost pile are all doing overtime to keep up with the onslaught of produce. I guess that make me a busy woman too! But first, some pretty flowers...


Red gladiolas by the back porch. I love these things and can't get enough!


Black-eyed Susans blooming their little hearts out.


A Tigger Melon blossom. I ran out of steam by the time I planted these and only have 4 plants growing...I'll guess we'll see what happens.


The Tomato Prison...protecting life, liberty, and the pursuit of salsa.


We are up to 132-135 lbs of ripe tomatoes picked this season. Hubby and I had a bet. I bet that we would harvest 90 lbs and he bet 120 lbs....looks like we have both lost and we still have MUCH more to go. Basically, we have grown an entire human being in tomato weight!


Cutie patootie Paris Market carrots. These babies are about the size of a ping-pong ball or smaller. Originally, I was going to pickle them, but I couldn't find a recipe that I was interested in, not to mention I didn't think that each one of these tiny things would need to be peeled. They are going to be roasted with my measly beet harvest for dinner tonight!


Happy parsley is happy!


Bush beans are growing. I am going to have A LOT of beans (god willing) this season.


A lovely visitor on some basil flowers. I haven't had to buy any basil this year for pesto!


My languishing Malabar Spinach. I'm not sure why this isn't crawling up that trellis like a wild fire. I've given them a boost of organic fertilizer a few weeks ago and barely anything..oh well, you can't win them all.

Monday, July 21, 2014

Tomato Prison

This is what it has come down to in order to keep the friggin' crows out of my tomato patch:


I have cattle panel fencing, tin foil tied to pieces of string, twine strung across any opening, and electrical wire running along the bottom of the boxes.


At first when this all started, I thought we were having mice or rats, so we set out mouse traps. I was losing about 4-5 green tomatoes a day and had to do something. The tomatoes that were damaged didn't actually have gnaw or teeth marks on them, they seemed to be hollowed out completely from a small opening in the fruit. When we didn't catch any mice and the damage continued, I was suspicious. I knew it was something larger than a mouse/rat, as some of the limbs on the tomato vines were broken from something larger trying to get at the higher setting fruit.

I hung sheets of tin foil on string and that worked very well for a while. The occasional crinkling and noise put off from the tin foil rustling in the slightest breeze even spooked me out. It sounded like someone, or something, was sneaking up on you from behind. But still more loss.

So, I ordered this battery operated electrical wire from Amazon. Even though it is operated by D batteries, it still puts out a good zap and it has worked from keeping ground dwellers out. It worked for a while, but we still continued to lose tomatoes. I was setting my sights on the crows more and more until one day I caught one red-handed (winged?). I took a look at a tomato that was damaged and then noticed a definte "V" mark made by a beak.

The little shits land in the yard and walk right up to the beds and help themselves like it is some sort of grocery aisle. The electrical wire stopped them for a time, until they figured they could hop right over it in between the rows and party on, so we had to set up the cattle panels with the twine on top of everything else. The crows won't go into an area where they can't easily have a wing span to get out in case they are caught. They won't go into an area where they can't fly out and escape quickly.

This has worked (for now) and I scare the fcukers away from the property every chance I get. My tomato patch looks like some sort of ghetto, produce prison. Whatever....now if I can keep the bunnies from eating my hollyhocks!

Thursday, July 17, 2014

Ground Cherries

This past winter, I decided to winter sow some Cossack Pineapple Ground Cherry seeds that I ordered from a seed company. Descriptions for the fruit on these unusual plants include "pineapple in flavor" or "mango-like" and I was curious. They are in the same family as tomatoes and tomatillos, and from what I've read, they are an old garden fruit that were once grown abundantly, but not any more. The fruit makes an excellent jam, so of course that convinced me to give it a try.

More research revealed the seeds needed stratification (cold weather) to sprout and were notorious for taking a long time to do so. Well, during the winter, time is all you have, so I planted them without any expectations. To my surprise, they have done exceptionally well! At first, I wasn't bowled over by their flavor, but then I learned they needed to really ripen to get that pineapple flavor.


They do look like tiny tomatillos in their husks, but when you peel the husks back, they are about the size of a very small grape.


The plants grew to about 4 feet tall! And true to their name, the ground cherries are ready for "picking" when they fall off the plant to the ground. It's like nature's own Easter egg hunt.


I usually make two or three passes around the bed they are growing in and have been picking a bowl-full every 2-3 days. The plants have been super tough and nothing has bothered them, not even the crows! They have been pestered by flea beetles and white flies, but that hasn't slowed them down at all.

More research told me that the cherries freeze wonderfully in order to gather enough for jam, so that is what I have been doing. I let them sit in a bowl for a few days in their husks to fully ripen and dry the husks out before peeling and freezing. I can't wait to see what kind of jam these babies will make!


Tuesday, July 15, 2014

Sixteen Pounds

On Sunday, I harvested 16 pounds of tomatoes from my tomato patch. I picked 13 pounds last week, which were partly devoured on BLTs, with cheese and wine, and in salads before the rest were processed in pints for the most honored sauces.


This brings my season total up to almost 30 pounds, as I didn't weigh the first few I picked earlier. There's probably a good 20-25 more tomatoes ready to be picked even as I type...gotta love it! This batch is destined to be sliced and mixed with some fresh basil, mozzarella, olive oil, and balsamic vinegar. What is left over will be made into salsa. So far, my favorite has been Early Girl in taste. There are two German Johnson's in this batch that are heirlooms and I'm curious to see what they taste like.

Unfortunately, all of my winter sowed tomatoes weren't mature enough to make it into the garden beds and are being grown in pots. I didn't think they would make it, but surprisingly they are doing just fine. They have set fruit, but they won't be ready for a while. Next year, my goal is to only grow tomatoes that I grew from seed. No store bought transplants, even if that means I go without.

Thursday, July 10, 2014

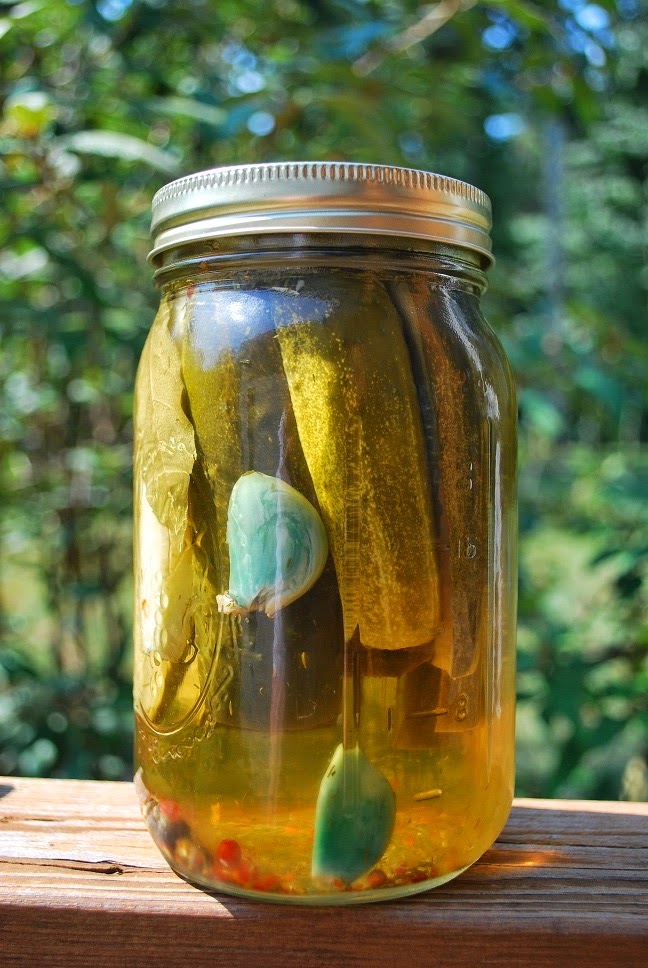
Why Does My Garlic Turn Blue?

I was getting ready to write a post about the PERFECT dill pickle, when this happened...


Looks scary, huh? Sometimes this happens to me and sometimes it doesn't, so I decided to look into what was going on. From what I found:

"Garlic contains anthocyanins, water-soluble pigments that turn blue, green or purple in an acid solution. While this color transformation tends to occur more often with immature garlic, it can differ among cloves within the same head of garlic. The garlic flavor remains unchanged, and it totally edible without bodily harm."


And since I had just picked up some garlic from the farmer's market last weekend versus buying garlic that had been sitting in a basket in the grocery store for who-knows-how-long, that pretty much sums it up: Younger garlic will most likely turn blue/green when you pickle. 

So, it looks like this first batch of pickles will be destined for only me and my husband, as previous experience has told me that people who don't know this scientific tidbit tend to freak out when they see it. As much as I would love to use local, fresh garlic for my pickles when pickling cukes are in season, it ain't happening and I'll be digging into that basket at the grocery store.

Tuesday, July 01, 2014

Here It Comes!

Here are the first tomatoes of the season! It won't be long before I'm up to my armpits in produce and canning like crazy.


We've had to start bringing in the tomatoes when they are just starting to ripen as the crows have decided to use my garden as a drive through snack bar. What makes me even more mad is that they like to eat the green tomatoes and have picked all the lower hanging fruit off the vines. I've had to resort to putting up electrical wire and playing Rush Limbaugh on a boom box outside when I am not there.

That will keep them away!

Tuesday, June 17, 2014

What a Real Garden Looks Like

We have been inundated with greens this spring. I planted waaaaaay too much bok choi, lettuce, and spinach for just the two of us to enjoy. And enjoy it we did! It's all gone now, as the heat has made everything bolt or wilt into slime. That's okay because I'm ready to move onto malabar spinach and bush beans.


All the extra greens we had were given out to coworkers and friends. I'm always surprised when people expect perfect produce and I want to tell them, "This isn't Whole Foods, but it's better." Yeah, it may not be perfect and it might even have a few blemishes or holes, but I can absolutely guarantee that it was grown organically and with love. It's a real garden, with food grown in real soil, with real bugs, heck I might even find a sneaky slug or two.


I don't use any pesticides or chemicals, so things aren't grocery store perfect. This is what food looks like grown in a real garden.

Wednesday, May 28, 2014

Garden State

The garden is off an running for the season! This past year, we added 5 more raised beds for more planting real estate. We have really compact, thick, mucky, red clay here and the easiest thing to do was go up, plus we had two large maple trees removed from this very spot and there are some serious roots still in the ground.

I tried winter sowing this past winter, which was surprisingly successful; however, I used styrofoam cups to plant within my mini greenhouse containers and I think next year I will just fill the containers with potting soil and plant in that. We are growing a lot of tomatoes and I am happy about that!

There are 10 beds total, which will be rotated with planting as the season carries on.

We planted 3 rhubarb starts at the front of the garden and they are spending their first season sending out roots versus foliage (I hope). A gardening friend says they do better from seed, but we'll see. When the greens and garlic are done next month, I will fill those two beds up with bush beans, and when the peas are done, I will plant malabar spinach.

I plan to plant that raspberry bush (it's in a pot now) where those PVC pipes are for my hoop house. It's a Bristol Black raspberry and I'm hoping I'll at least get to try a berry this year before the squirrels get to them. It sent out several runners last year that I dug up and grew in pots, so now I have enough raspberry plants to plant a small row!

I know you are thinking, "Hey Kathy, you have your tomato cages upside down!" Not so! I purposely turned those things upside down for more stability and to get the true height of the support cage. I know the tomatoes will grow taller than those cages and I'm not sure what I will do after that. I need a better system.

Big changes from last year, huh? We love our new garden shed too!


Wednesday, April 23, 2014

Salted Cranberry Grapefruit Jam

Back when the temps outside were frigid and snow was on the ground, I attempted to make Local Kitchen's Salted Cranberry Grapefruit Jam and it was a bust. The original recipe called for 1 red grapefruit cut up, to include the skin. When I made it, the bitterness of the grapefruit skin slapped me upside the head and I didn't like it one bit. I also felt it needed a little more sugar. But I did like the other taste profiles it had to offer, so I gave it another stab.

NAILED IT!

My newer version has just the right amount of salty/sweet/tangy, and it's definitely a grown up jam. This isn't the sticky, sweet, typical fruit jam you're used to for a bagel or toast; however, it does just fine for that in a pinch. No, I foresee this jam to be used on turkey or ham sandwiches or brushed over a crispy pork roast as a glaze. Again, a new favorite.


Kathy's Salted Cranberry Grapefruit Jam
(adapted from Local Kitchen's recipe)
Makes 4 1/2 half pints

1 lb. cranberries (frozen or fresh)
2 red grapefruit (medium)
1 cup water
1 cup dry white wine
2 heaping teaspoons of sea salt
4 cups of sugar

Day 1: Peel both grapefruit and remove as much of the white pith membrane as possible. Cut the grapefruit flesh into small pieces, about 1 inch in size. Combine the cranberries, grapefruit flesh, water, white wine, sea salt and sugar in a wide Dutch oven or stockpot and bring to a boil. Reduce heat to a simmer and cook mixture for 15 minutes. Remove from heat and cool. When completely cool, cover and refrigerate over night.

Day 2: Bring mixture back to a boil over med/high heat and boil until mixture reaches gel stage (about 20 minutes or 212 degrees), stirring constantly. Ladle mixture into prepared jars and process in a boiling water bath for 10 minutes.

Friday, April 11, 2014

Canning Sauerkraut

Well, remember that sauerkraut I started a few months ago? Well, this week we finally determined that it was perfect and canned it into 18 quarts of yumminess.

We actually had to move the pickling crock it was fermenting in to the garage from the basement. For about a week after it had first started fermenting, I kept wafting something that smelled like someone forgot to take the garbage out in the kitchen. After determining it was not the garbage, I sniffed around the whole kitchen, convinced that the refrigerator had something smelly in it or even maybe the kitchen sink was leaking. Finally, it dawned on me that MAYBE that 5 gallon crock of fermenting cabbage in the basement might be the cause of the phantom stink. Sure enough it was. Last time I made sauerkraut, we were renting a house that had a separate, closed in room in the basement, which is why it didn't smell.

Lesson learned.

Anyway, after 3 1/2 months of fermenting in the garage, this is what it looked like:


I removed the half gallon jar of water and plate it was sitting on top of to weight down the sauerkraut. After that, I skimmed off the floating sauerkraut on top and transferred the sauerkraut and brine to the pot using a pair of tongs and ladle.

I hot pack my sauerkraut and follow the canning instructions for sauerkraut as outlined in the Ball Blue Book. It is important to NOT allow your sauerkraut to come to a boil (heat it just to a simmer, then turn off the heat), as you do not want to kill all those very important probiotic yeast cells that were produced during fermentation. Plus, who wants limpy sauerkraut?


After heating, I pack my sauerkraut into prepared quart jars and fill to the top with the fermentation brine. I always make "extra" brine in case I don't have enough ladled out from the crock (which is almost always the case). According to the Ball Blue Book, 4 1/2 tsp. of canning salt per quart of water (heated) can be used for extra canning brine. I usually make a double, or even triple batch of extra brine and compromise with half fermented brine and half made brine for each jar. That way, each jar is getting a little of that natural, fermented brine.

Each jar gets 1/2 inch of head space and a batch of jars gets 10 minutes of processing in a boiling water bath. I usually have to process 2-3 batches, as my canner will only hold 7-8 quarts at a time. I process on a glass top stove and don't want to chance stacking quart jars in my canner and cracking the glass top (although I do want a new stove....hmmmm).

 I usually get 16 -18 quarts per batch of sauerkraut in my pickling crock.


See the juniper berries? Yummy, yummy, yummy! I can't wait to grill up some bratwursts this summer and put a big ole' pile of home fermented sauerkraut on top!


Thursday, March 20, 2014

Spring?

Well, today is the official first day of spring, but this is what we woke up to last Monday morning:


Not very encouraging, I know. We are all a little snow weary this season, as we've had 6 snow storms in the past 6 weeks. It's still a new concept to me and I do enjoy the unscheduled "snow days" from going into the office, but even I'm like, "ENOUGH!"

But even as I type this post, the sun is shining outside, almost all that snow is melted, and the temperatures are supposed to get into the 50's or 60's today. Here's hoping that spring is just a little bit closer.

Thursday, March 13, 2014

Sugar Shack

Last weekend, hubby and I took a day trip and headed southwest to Highland County, VA for their annual Maple Festival. We had been meaning to go to this festival for the past couple of years, but never got around to it for one reason or another. It’s only held for the first two weekends in March, and from what I understand, the maple sap used to make maple syrup only flows for a short time here in Virginia. I guess you can’t nail down Mother Nature for an exact date!


From what I gathered, the best maple sap to collect from trees in Virginia is from the ones that grow between 3,000 and 4,000 feet above sea level.  We definitely spent a lot of time driving on twisty-windy mountain roads to find this festival!  Straight from the tree, maple sap (or sugar water) collected from maple trees is made up of approximately 98% water and 2% sugar. It takes approximately 40 quarts of sugar water to make 1 quart of maple syrup, and a good tree will produce 20 quarts of sugar water every 12 hours!


The Maple Festival featured several sugar shacks that demonstrated how to make maple syrup. To make syrup, excess water is boiled away from the sap. Because a large amount of steam is produced when boiling off the sap, it’s not recommended to do this indoors, hence the separate sugar shacks. Making maple syrup on the home front usually involves using one large pot, but at a sugar shack, they use huge troughs filled with sugar water and build very hot wood fires under each trough to boil off the sap.


Can you imagine if you made this much steam in your house? It would be a good way to peel away ugly wall paper!


It was still pretty chilly outside, but the sugar shacks were VERY toasty and smelled wonderful. It was like a hillbilly day spa!


At each stop along the Maple Festival route, there were all kinds of maple-y treats being sold. We enjoyed a few of the local maple donuts that day.


After the festival, we stopped at a local freshwater trout farm and had one of the best fish sandwiches I've ever had. Unfortunately, I didn't get a picture because I was really hungry! Being from Florida, it's not often that I ate freshwater fish. In fact, I don't think I've ever had freshwater trout before that day. All in all, it was a great day! 

Picture from Faces of Farmers.org

Monday, February 24, 2014

Ipsy February Glam Bag

Although I like to dig in the dirt for my garden, I also like to girl-it-up during the work week. I signed up for two sample beauty and makeup services three months ago: Birchbox and Ipsy, and so far I am really enjoying the surprises that show up at my door every month. Birchbox, from what I've found, leans more towards beauty and skin care, while Ipsy leans toward makeup. I never know what they are going to send me each month; they only use the beauty profile information I gave them in my application. There's been a few times where I was like, "Meh" on what I received, especially the tea-bags that were sent to me by Birchbox, but Ipsy had been hitting it out of the park as far as I'm concerned.

This month, my package arrived right on Valentine's Day, which felt like I was sending myself my very own special Valentine. Hubby really slacked this year, so it was nice to have something unexpected show up and brighten the day.


I got a beautiful light plum Zoya nail polish (can't remember the name), "Peony Petal" lip gloss by POP Beauty, "Ambrosia" liquid eye shadow by Eyetini, cleansing face mask samples by Skyn Iceland, and lastly a set of real human hair eyelashes and eyelash glue by J.Cat.

I can't wait to try the nail polish, as I've been hearing good things about Zoya, and I LOVE the color! Wish I could remember the name. The lip gloss is almost exactly the same color as my favorite lip crayon from Ulta named "Rocker Pink," so I was excited to try it. Although it goes on really saturated, I don't like the way it smells. It kind of reminds me of dry erase board markers!

I've never tried liquid eye shadow; however, "Ambrosia" is almost exactly the same as my favorite color by Urban Decay, "Toasted". Isn't it funny how we get excited by the colors we already like? Anyway, it was really nice going on. I found using the pad of my finger worked better than the applicator; however, the shadow did crease by the end of the day, even when using Mac's Paint Pot "Painterly" as a primer. Oh well, I'll still keep this as a travel shadow as the color is gorgeous.

Of course, I haven't tried the lashes, as I think those are really for special occasions, and I've yet to try the cleansing masks.

Overall, I really enjoyed this month's glam bag; thanks Ipsy!

Sunday, February 16, 2014

Dreaming of Spring

Having cabin fever during the winter gives you a lot of time to catch up on small projects around the house. In this case, hubby and I finished building our new raised vegetable garden beds for the upcoming season. The beds are 10 feet by 4 feet, and when the snow melts we will flip them over and pound the corner stakes into the ground.


Last year, we started out with 4 raised beds and then added a fifth at the end. It was definitely a learning experience. Our cucumber crop came in like gangbusters, but our tomatoes were struck by early blight from all the wet weather last year and being planted too close together. Later, the tomato plants that survived were ransacked by squirrels. Our bush beans were wonderful, but our beets were a bust from over seeding and not enough thinning (but the beet greens were great!). We planted sweet potatoes that did so-so, mostly we think from not enough sun, and the leeks were pretty successful. And onion slips rotted due to all the wet weather.


Ironically, the most challenging thing we came across from starting a raised bed garden was finding planting medium to fill them. Last year, we had to use purchased garden soil and bagged compost. This past fall, we managed to squirrel away a lot of leaves and started a second compost pile to help amend. We'll still have to purchase some bagged garden soil, but hopefully just this one time to get us started. From that point on, the beds will be amended and built up with compost, leaves, and cover crops.


So, now we have 10, 10' x 4' raised beds and we have a busy season planned. So far, I plan on growing the following vegetables this year:

Tigger Melons
Red Malabar Spinach
Bush Beans
Mammoth Melting Sugar Snow Peas
Giant from Italy Parsley
Butterhead Lettuce
White Stemmed Pak Choi
Paris Market Carrots
Supersauce Tomato
Buttercrunch Lettuce
Sugarloaf Endive
Catalogna Chicory
Black from Tula Tomato
Brandywine Tomato (Suddeth's Strain)
Atkinson Tomato
Druzba Tomato
Cossack Pineapple Ground Cherry
Corvair Smooth Leaf Spinach
Win-Win Pak Choi
Detroit Dark Red Beet
Chioggia Beet

In addition, I have a bunch of flowers and herbs that are going to be planted as well. I'm still on the fence about a fall planting. Last year, I was more than ready to put the garden to rest at the end of the summer season, but for now c'mon spring!

Friday, February 14, 2014

Snowmance

Valentine's Day has been a bust. I was supposed to go into work today, which we were also having a potluck, but the roads are a mess and I'm "working from home". So, what do you do on Valentine's Day when you are snowed in?


You shovel the front walk way and driveway (thank God for nice neighbors with tractors and snow plows).


You retry that Salted Cranberry Grapefruit Jam recipe.


You make a big batch of homemade chicken broth to be used for chicken noodle soup and canned chicken broth.


You bake (although I made these particular pies a long time ago in another kitchen...but you get the picture).


And then, dream of spring.


Wednesday, January 29, 2014

You Win Some, You Lose Some

It's citrus season, so I like to keep my eyes open for new canning recipes to try. I spied this yummy sounding recipe for Salted Cranberry Grapefruit Jam from Local Kitchen last year and I immediately made a mental note to give it a try. So, over the holidays I grabbed a few extra bags of fresh cranberries, threw them in the freezer, and waited.

Last weekend, I picked up a large, red grapefruit and started on this recipe Monday night. Initially, it tasted wonderful! It was salty, sweet, and sour all in the right places and I had hopes this would be my next new favorite preserve. But after letting it macerate for 24 hours and boiling it down to the jelling stage, the grapefruit peel took over and slapped me upside the head. It was really, really bitter. Bummer.

Grapefruit peel has a tendency to do this, and you have to be a hardcore marmalade lover to get over the bitterness. Some English marmalades are made specifically to be really bitter, but I don't like them one bit, and I won't give a jam or jelly away to someone if I don't love it myself.

Shame; it jelled up perfectly too. Well, back to the drawing board. I'm going to try this recipe again with only the grapefruit pulp and no peel.


design + development by kelly christine studio